

It’s wonderful to walk through a wooded forest after it’s rained and find a mushroom popping out of a log or in between downed trees! Most of these mushrooms however are not edible. But it is possible to start growing shiitake mushrooms in your own backyard or greenhouse – especially if you have a Shiitake Mushroom Kit – and pick them as they spring out of the wood and beckon to be devoured.
Mushroom growing is a little different from raising herbs or other veggies in your garden. But it is a fun process and a good way to get new gardeners involved with growing their own food. Once you understand a little about the steps involved, you’ll see it’s actually quite straightforward to grow shiitake mushrooms!
Years ago, people could only grow shiitake mushrooms in forests in East Asia. However, we’ve come a long way and can now grow them around the world. They’ve become so popular in fact, it’s estimated about 25% of yearly mushroom production is shiitake mushroom.
With a taste similar to wild mushrooms, and packed full of that deep umami flavor, this little mushroom is worth the wait. A little bit larger than button mushrooms and filled with vitamins, it is said that it can boost your immune system.
Shiitake mushrooms are fundamentally different in their growth habits than anything else in your garden. They are fungal spores that are dormant until they find the right conditions to grow in. In order to help these little guys spring into life, you’ll need to create a home for the mushroom spores to grow and reproduce in. This planting medium is usually a freshly cut log or a sawdust substrate. With the growth of online retailers selling all sorts of plug spawn that has been inoculated, shiitake growing at home has never been easier!
About Shiitake Mushrooms
Shiitake mushrooms are a delicious edible fungus from East Asia, ubiquitous in Japanese and Chinese cooking. It’s now possible for people throughout the world to grow these mushrooms in their own homes, yards, and yes… even bathrooms!
Growing shiitake mushrooms, like all mushroom species, can seem a bit odd for the longtime gardener if you’ve never grown them before. However, it’s worth learning how. These small capped mushrooms are worth the bother as raising them, either in grow bags or in logs, seriously cuts down on their cost.
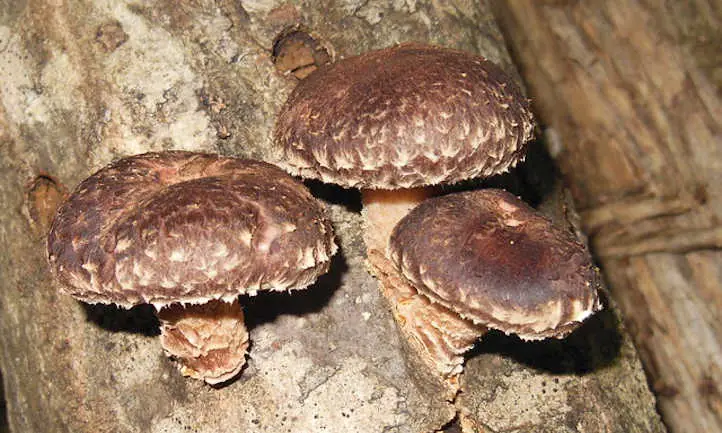
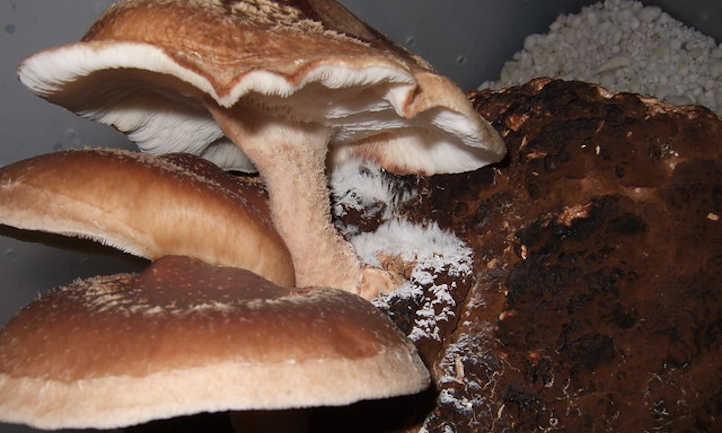
The Lentinula edodes is a brown mushroom with a cap 2-4 inches across with a light brown somewhat spindly stem. The cap of the mushroom can sometimes look a bit like a small pancake! Around the edge of the cap are small white spots. Underneath the cap, there are ‘gills’ or what looks to be tightly folded tissue that form a beautiful pattern.
Like all mushrooms, the Lentinula edodes is a fungus. The common name shiitake literally means castanopsis mushrooms, after the Castanopsis cuspidata tree (also known as the shii tree) which is native to Japan. While this mushroom thrives in nature throughout much of East Asia, it does not compete well with fungi growing elsewhere in the world, which is why sterilizing the logs or substrate you’re using as a host to grow shiitake mushrooms is so important.
There are two main types of shiitake mushrooms, the Donko, a larger mushroom that is more highly sought after, and the Koshin (Ko meaning small in Japanese), which is a small mushroom with thinner flesh and an open cap.
While gardeners may find that wild mushrooms pop up seemingly overnight in their own backyards (especially after a fresh application of compost), they may be surprised to find out that growing Shiitake mushrooms can be quite a long process. If growing in a sawdust substrate mushrooms will take a few months from inoculation to harvest. If growing in wood, you can expect a harvest in up to 2 years, yes you read that right, 2 years!
Shiitake Mushroom Substrates
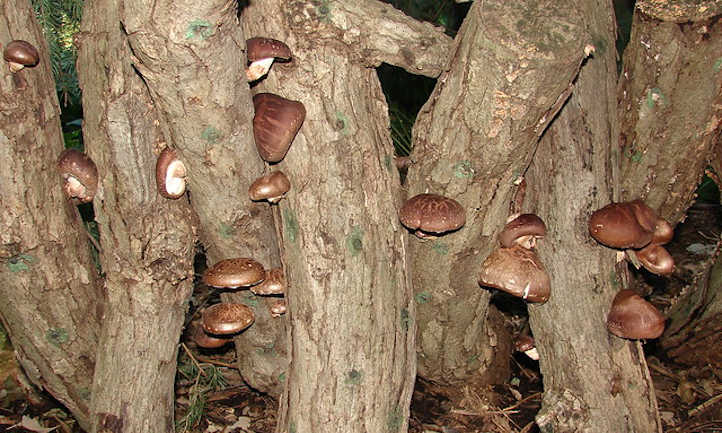
In its native environment, you’d find shiitake mushrooms growing on decaying logs (specifically Shii tree logs) in East Asia. These areas are generally shaded by the forest canopy and very humid. To emulate nature, there are two methods commonly used for growing mushrooms. You can add mushroom plugs to a log of a hardwood tree and get harvests for 6-7 years, or you can grow in a grow bag and inoculate a mixture of sawdust and bran to get a harvest much sooner.
Hardwood Logs
Growing mushrooms in logs is a great option for gardeners who have access to woody areas or who are growing mushrooms to sell. Freshly cut trees like an oak in late winter are a good choice. You may find that starting the inoculation in the spring will also bring about the best results for this delicious fungi.
Growers need to start with a recently felled log. As strange as it may seem, this is a crucial step. It’s important to use a freshly cut log or branch about 3-6 inches in diameter and not a log that has been sitting for longer than two weeks. The reason for this is that the mycelium need to get a head start on colonizing their new home. As shiitake don’t compete well against wild fungi outside of their native environment, they need a blank slate – which is what a fresh log provides.
If you’re taking the time to grow in logs (called bolts), you’ll want the logs to be about 3-4 ft. in length. The length of one log should be the length of all of your logs.
For wood choice, its native Castanopsis cuspidata is best, but if unavailable, you can also choose oak, beech, maple, ironwood, alder, or poplar. Be sure to use a hardwood like oak as the mycelium struggle in softwood, especially fruit trees and pine.
Hardwood Sawdust
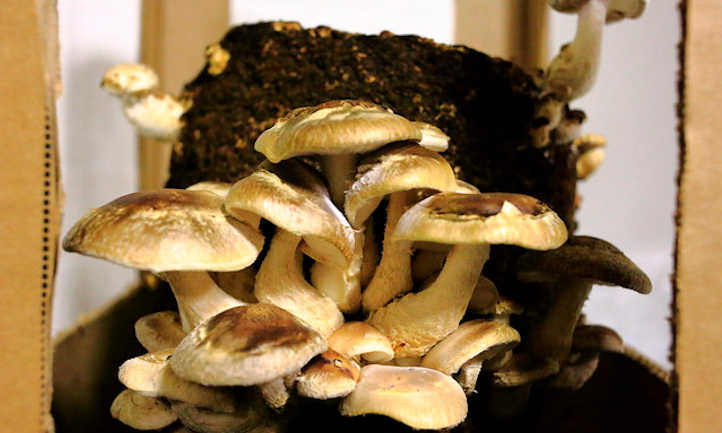
For growers who want a smaller or quicker harvest, your best choice is growing in sawdust blocks. These tightly packed bricks of fungi cultures will produce 5-6 harvests over a single year and can be managed by growers of all skill levels. After one year, however, you’ll need to start with a fresh substrate.
If you don’t want to mix in the spores yourself, you can even order one online and go straight to the fruiting stage. This is a good option for people who want to try it out before committing to the entire life cycle process. Kits provide an easy starting option for the new mushroom farmer.
Growing in these blocks is a great option because while mushrooms don’t need logs, they do need the cellulose commonly found in logs. This cellulose is also present in sawdust. Additionally, as with logs, hardwood sawdust is strongly preferred. Additionally, many people find that by mixing in rice bran, oat bran, or straw, they get larger and tastier harvests.
Some common recipes are: 95% sawdust, 3% rice bran, 1 % wheat bran and 1% chalk or 75% sawdust, 24% straw and 1% chalk. Percentages are approximate.
Before inoculating, you’ll need to pasteurize your mix and anything you add to your sawdust recipe. Oftentimes a pressure cooker is used to achieve the correct temperature. Alternatively, your mix can be boiled for an hour to achieve similar results. Pasteurization is achieved between 160-180 degrees (temperatures that are similar to cooking meat until it’s done). This removes most but not all of the living microorganisms in your substrate. Be sure to allow your substrate to evenly cool down to room temperature (about 70 degrees) before adding an inoculant. If you add your inoculant while it’s too hot, you run a good chance of accidentally killing it.
Inoculating Your Shiitake Mushrooms
In order for the shiitake mycelium to extend throughout its new home and thoroughly colonize it to then produce mushrooms, you’ll need to inoculate your growing medium. By inoculating, you’re introducing shiitake spores into its new home, and you’re doing it in such a way as to keep from accidentally adding a stowaway wild spore as well.
There are two main methods to inoculate your growing medium. For cut logs, small holes are usually drilled into the side of the wood, and a small inoculated plug is inserted and capped in wax. These shiitake logs are then stacked on top of one another while they grow. If growing in sawdust, the inoculant is usually broken up into small pieces and evenly mixed into the substrate.
Once you’ve decided on which inoculant to go with, go ahead and obtain it. You can store your substrate or plug spawn in the fridge while you wait for optimal conditions to inoculate your substrate. As it’s more important to add mushroom spores to your growing medium when you’re growing medium is sterile, plan ahead. You can certainly keep the spores in your fridge for a week while waiting to start the process in spring.
Inoculating Logs
After you’ve acquired your freshly cut logs (4 feet long is best!), you can begin to prepare them for inoculating. Using a good power drill with a specialized drill bit that removes the wood shavings as it bores, drill holes one inch deep and about 2-3 inches apart in a row. Ensure that your drill bit is sterilized so it doesn’t introduce any pathogens into your mushroom logs. Start a second row with holes that are staggered in between the original holes. You’ll end up with holes in a diamond pattern, thus maximizing space. Continue boring holes over the entire log.
Once you have your holes bored you’re ready to add your shiitake mushroom plug spawn or sawdust spawn. If using plugs, just slide each plug into a hole and seal it off with wax. If using inoculated sawdust, use an inoculation tool to insert the sawdust into the holes. A mushroom inoculation tool is relatively easy to find online. On average, cut logs can use 30-40 plugs for every 4-foot long log. After you inoculate the logs, seal with beeswax, paraffin, or cheese wax.
Once the cheese wax or other wax has sealed in the plug spawn, the mycelium have a better chance at colonizing entire logs, and the logs can better retain their moisture content. Use a soft wax when possible, as this is easier for young fungi to push their way through.
Using pre-made plugs is often the easiest method for a new mushroom grower. These plugs are already set to go with the spawn of your desired shiitakes, and a few taps will ensure your plugs are set right where they need to be. If there’s any excess plug remaining, you can use an angle grinder to cut it cleanly off before capping it with wax.
Inoculating Sawdust
Another method open to growers is using sawdust instead of logs. Inoculating this substrate is also a bit easier if you use the right tools. Once you have your pasteurized substrate, it needs to be evenly mixed with inoculated sawdust spawn. Before mixing, make sure that the container it’s getting mixed in, along with any tools you use, are sterilized. Gloves or very well-washed hands are essential at this point.
Once your substrate has cooled after pasteurization, thoroughly mix in your sawdust spawn. It’s essential to break up your spawn into as small-sized pieces as possible as it will mix more evenly into your substrate. Mix well, and stuff your substrate into a sterile bag for colonization. An even distribution of spawn will bring about quicker colonization.
Alternatively, you can also use mushroom spawn in the form of plugs to inoculate the grow bags. However, as these are larger pieces, it will take longer to colonize the bags as the spawn isn’t evenly distributed throughout the substrate.
Shiitake Colonization
Once inoculated, the fungi needs to spread or ‘run’ through its new host before it can fruit. This process requires time. With logs it can take up to a year, with sawdust a bit less of a wait at 8 to 12 weeks. Meanwhile, the mushroom log or substrate needs to be kept evenly moist. Avoid your logs or substrate getting dry at all costs.
For mushroom logs, stack them on the ground in a forest, greenhouse, or another shaded area about 6 inches off the ground. If you keep the logs near the ground for months at a time, the logs are automatically exposed to more humidity coming from the soil. Wait for the colonization to take place. You’ll know that it’s happening when the edges of the log begin to have white splotches appear on it. This growth usually starts in the center and grows outwards. Once they’ve gone through a year of colonization they can then be placed in a ‘crib stack’ – two by two into a box form.
Make sure your logs aren’t covered in plastic or other impermeable cloth. They need air and moisture flow. Burlap or something similar to keep them out of the sun is acceptable. Additionally, keep them away from high winds or too much sunlight as that also will dry out the log and prevent fruiting. If during this time you find that your log dries out, either throw the logs into a water source like a stream or pond or hose them off multiple times over the space of a few hours. Keeping the wood evenly moist is crucial.
For logs, this time period is called the ‘spawn run’ as the spawn are forming webs or runs throughout the log and slowly but surely making it their home. This can take from 8 months to two years but is worth the wait.
For people looking to produce mushrooms in bags with sawdust, the spawn run takes much less time. It should only be about an 8-12 week wait before the block turns a light brown color signaling success. Once it reaches this stage it’s ready to be fruited.
Initiating Fruiting
Fully colonized shiitake logs or sawdust bags are waiting for the rain to arrive for it to send out mushrooms. As growers have access to running water, this process can be faked to get the shiitake mushrooms to speed up and produce earlier. This step is called ‘shocking’ the shiitake logs into fruiting early.
For growers using shiitake logs, it’s best to soak the logs in cold water for a period of 24 hours once it has been fully colonized. This can be done in a lake, bathtub, or even water trough. Make sure the water is cool enough that it doesn’t kill off the spawn – room temperature to chilly is best. This should cause the shiitake logs to fruit within 7-14 days. At this stage, begin to watch out for slugs which can be the biggest threat to your shiitake mushroom harvest.
For mushrooms grown in a substrate, a similar process is needed. Using a bucket or large basin, add your mushroom grow bag to cold water and let it stand for 2-3 hours. However, it’s important that the water not be chlorinated as this could kill the spores. Use either filtered water or water that has been sitting out for 24 hours (to let the chlorine gas leave the water) to soak your shiitake mushroom grow bag in. Once the surface of the substrate begins to develop bumps, that means it’s almost time for the mushrooms to begin growing. The next step is to take the substrate completely out of the bag to increase airflow. It should be held together with the colonization of the substrate while your shiitakes pop their way out.
Harvesting
Once you’ve shocked your shiitake mushrooms, keep an eye out for their growth. At this stage, they develop rapidly. Once the mushroom appears and develops ‘gills’ on the underside of the mushroom cap, it’s time to harvest. Cut it off the log or substrate with a clean and sharp knife being careful not to damage the growing medium in any way. This is because shiitake mushrooms can be harvested multiple times. Shiitakes grown on logs will continue fruiting over a period of 6-7 years, and ones grown on a substrate will fruit 5-6 times per fresh bag of sawdust.
Once the shiitakes have been picked, either use them right away or store them in a brown paper bag in the fridge. They need to be kept cool and dry and can be kept for about a week in the fridge.
Alternatively, shiitakes can be frozen or dried to preserve them for longer amounts of time.
What To Do With Spent Substrate
Spent shiitake logs or substrates still have a lot of life in them, but it might not be to grow mushrooms anymore. Gardeners will recognize spent mushroom substrate as wonderful compost to add to their gardens. There are only a few flowering bushes – gardenias, camellias, and hydrangeas that don’t like mushroom compost. But other than that, the spent shiitake mushroom substrate is garden gold!!
Large amounts of substrate should be ‘weathered’ for a few months in the open in mounds to let the salts leach out of it before being applied to fruit and vegetable crops. Smaller amounts can be evenly mixed into new garden beds or and added to worm bins. You may even accidentally grow shiitake mushrooms right in the top of your worm bin!
Additionally, substrate can be added to the top of newly seeded lawns as the sterile but nutritious matter will retain moisture and will feed a new lawn.
For logs that make it through the 6-7 fruiting years and are still intact, try burying them in new garden beds or where you plan to grow in the ground. They will break down and feed the soil needed nutrients for years to come.
Publicaciones relacionadas:
 Cultivo de brócoli: “Árboles” diminutos y sabrosos
 Geranios: cultiva estas flores prolíficas y coloridas en tu jardín
 Pulgones: plagas molestas que realmente apestan
 Cultivo de perejil, la hierba infrautilizada
 Plantas Xeriscape: 35 opciones resistentes a la sequía
 Cómo bajar el pH del suelo o aumentar el pH del suelo
 Dioscorea Japonica: Yamaimo, ñame de montaña japonés
 Planta de lino: fibras, semillas y todo lo demás