
Do you want to know how to grow oyster mushrooms successfully without purchasing a new pink oyster mushroom kit, yellow oyster mushroom kit, or tree oyster mushroom kit each time? Perhaps you’d like to grow a variety that isn’t typically found in kits? Let’s see what you need to start and how to do it!
Most oyster mushrooms are low-calorie foods that are high in protein and are high in vitamin and mineral content. While they are reputed to have medicinal properties, especially in Asian medicine, they are still being studied in terms of their medicinal properties. They are reputed to aid in lowering cholesterol in one ongoing study, but how successful has yet to be determined.
They’re also delicious and are a common umami flavor in a lot of Asian foods, especially Chinese and Japanese cooking. Some varieties are described as being meaty in both flavor and texture, and they’ve become popular substitutes for meat products for those on a vegetarian or vegan diet.
Types of Oyster Mushrooms
There are many varieties out there, and you’ll need to choose the best variety for you. Some of the most popular types include:
Pleurotus ostreatus var. columbinus ‘Blue Oyster Mushroom,’ ‘Blue Pearl Oyster Mushroom’
The blue oyster mushroom usually colonizes its growing media quickly. They are a cold-weather variant of the pearl oyster mushroom, Pleurotus ostreatus, and grow in temperatures from 45-65 degrees Fahrenheit, although they do not fruit heavily unless it’s around 60 degrees. They like lots of fresh air to develop their large caps, which means that they can perform well outdoors. The non-blue variation of this species is widely grown throughout Asia and is used heavily in Chinese, Japanese, and Korean cooking, but the columbinus variety is very similar in flavor and texture to its whitish namesake.
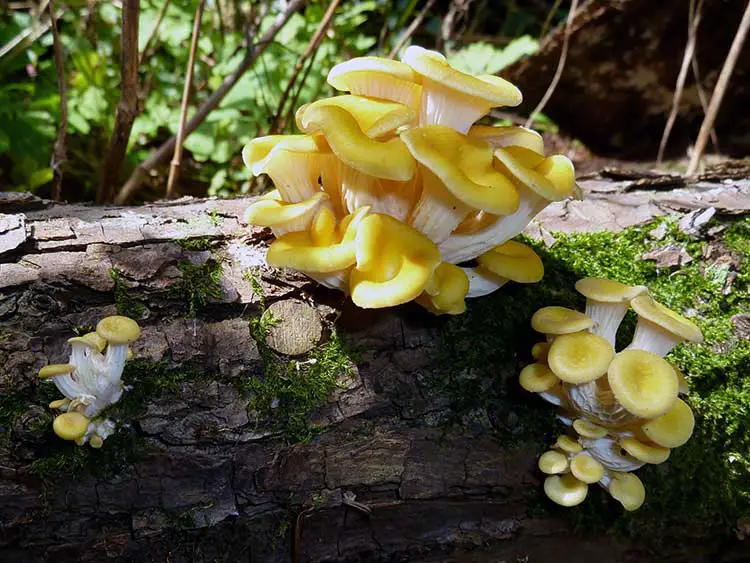
Pleurotus citrinopileatus ‘Golden Oyster Mushroom’, ‘Yellow Oyster Mushroom’, ‘Tamogitake’
Originating in Japan, northern China, and eastern Russia, the golden oyster mushroom lives naturally on decayed wood. In the wild, it seems to prefer hardwoods like elm. However, as it’s a popular edible mushroom (especially in China and Japan), they are often cultured commercially on a growing medium of grain, straw, or sawdust. They are reputed to convert 100 grams of organic refuse into 50-70 grams of mushrooms, so they’re wonderful at converting waste to food. They are also considered to have antioxidant properties.
Pleurotus djamor ‘Pink Oyster Mushroom’
These are heavy-yielding and vigorous growers. Vibrantly pink, they produce fruits in only three or four weeks. They grow well at temperatures ranging anywhere from 60 degrees Fahrenheit and up. They are also known to be prolific spore producers, so it’s important to harvest them before they drop spores, especially if growing indoors. Straw is an ideal growing medium for this type of mushroom, but it can also be grown on a supplemented sawdust. On straw, they produce at rates from 75%-150% of the normal, but the fruit tends to be smaller and more delicate. On sawdust, the fruit tends to be larger and meatier. They lose most of their flavor during cooking but can be cooked to taste quite similar to bacon as a vegetarian alternative.
Pleurotus eryngii ‘King Oyster Mushroom,’ ‘King Trumpet Mushroom,’ ‘French Horn Mushroom’
King oyster mushrooms are uniquely different in appearance and texture, unlike the other varieties. They produce large horn-shaped individual mushrooms rather than clusters. Growing king oyster mushrooms is surprisingly easy on used coffee grounds that have been sterilized, but they also can be grown on straw, sawdust, or even cardboard. The king oyster mushroom has the largest fruit of any of the Pleurotus species, and is widely grown commercially in Asian countries as well as in Australia. Its flavor is sometimes described as being similar to abalone.
Pleurotus populinus ‘Aspen Oyster Mushroom’
The aspen oyster mushroom grows throughout the northern United States and Canada. It is easily recognizable as it tends to grow in overlapping fan-shaped clusters, and it prefers to grow on decaying woods like aspen or related species (hence its name). It typically is thick and flattish in shape, and only has just a slight vestigal stem, unlike some other oyster mushroom varieties. It typically fruits in June and July.
Mushroom Substrates for Oyster Mushrooms
There are a few different choices for what you will use as a growing media, also called a mushroom substrate. While at least one Pleurotus variety will occasionally grow in dirt, most mushrooms generally don’t grow in soil like other plants and instead prefer unusual substrates to grow on. Some of the most popular types are listed below.
Straw
Shredded straw is a good substrate for growing oyster mushrooms. Ideally, you want straw that’s been run through a wood chipper or driven over with a lawn mower until it’s 1-3″ in length. Once it’s cut to size, you need to clean it and pasteurize it to kill off any microorganisms and to ensure it’s less likely to become contaminated.
To clean your straw, fill a tub or bucket with warm water and a small amount of dish soap (a couple of tablespoons is plenty). Place your straw in the water and work the soap through it quickly with your hands to remove any dirt or dust. Once it’s clean, rinse it with clean water until no more soap comes out of the straw.
To pasteurize your straw, you will need a large cooking pot and some form of strainer or mesh basket. Some people have also used bags made of cheesecloth to replace the strainer or basket. Fill your pot with water and bring it up to a temperature of 149-180 degrees Fahrenheit (65-82 degrees Celsius). Once the water is at the optimal temperature range, add your straw to the pot either inside the basket/strainer/bag or outside of it. Make sure the straw is completely covered in water, adding something on top to keep it under the surface as necessary.
Allow the straw to soak in your hot water, maintaining that optimal temperature range, for about an hour and a half. Then remove the straw, shake out as much water as possible, and lay it out temporarily on a clean surface to cool and finish draining — ideally, a table covered in sheet plastic that’s been cleaned with some rubbing alcohol to kill any potential contaminants. Once cooled, it’s ready to inoculate with mushroom spores.
Coffee Grounds
One of the simplest and cheapest growing mediums for oyster mushrooms is used coffee grounds. This waste material is very easy to source, as you can take a bucket to your local coffee shop and ask them for theirs. While they were pasteurized when the coffee was made, you should at least pasteurize them again to be sure that they’re safe from contamination. To do this, place your grounds in a clean linen or cotton bag, and then do the pasteurization process (heat water to the temps mentioned for the straw, place the ground bag in the hot water, and soak for 1.5 hours). Once you have soaked your grounds, carefully remove the fabric bag of grounds and set it (bag and all) into a strainer and allow the grounds to drain and cool.
One note: while the remaining water in the pot will look like coffee, I don’t recommend drinking it. But it will make your kitchen smell like coffee for hours!
Hardwood Sawdust
For oyster mushrooms that like hardwoods, like the aspen oyster mushroom, you may want to consider hardwood sawdust. These are quite popular when growing mushrooms for sale, especially when mixed with some wheat bran to add extra nutritional value for your fungi. Whatever you do, only use hardwood sawdust… mushrooms do not grow well on softwood sawdust.
Unlike coffee grounds or straw, you can’t just pasteurize sawdust… it must be fully sterilized, as otherwise, it’s prone to developing molds or other issues that will ruin your mushroom colony. The best way to sterilize it is by using a pressure cooker.
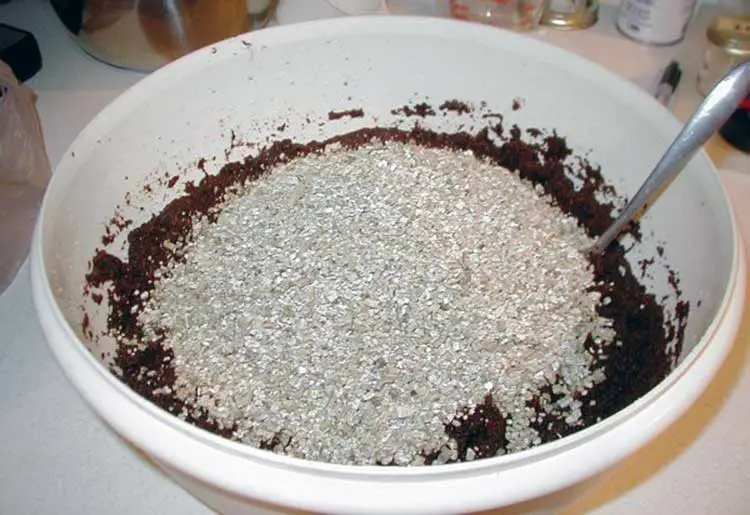
A good ratio of sawdust to bran is to combine just over 5 cups of hardwood pellets (available at most feed stores or in BBQ sections of big-box stores for smoker use) with about 1.5 liters of warm water and 1.25 cups of wheat bran for nutrition value. The warm water will break down the pressed pellets into sawdust. Then add your wheat bran and mix well to combine it through all of the sawdust. Fill your bag, pressing out all of the air while forming it into a block shape, and seal it before continuing with sterilization.
Place the filled grow bag into a pressure cooker and heat at 15PSI and at over 250 degrees Fahrenheit for at least 2.5 hours to ensure it has been fully sterilized. Allow your sterilized sawdust block, also called a fruiting block, to completely and fully cool before you inoculate it so that you don’t run the risk of killing your mushroom spores with too much heat.
Coco Coir and Vermiculite
Coconut coir, mixed with vermiculite, is a decent growing medium for many types of mushrooms as well. While oysters seem to really like growing on straw, sawdust, or sterilized coffee the best, you can make a blend of coco coir and vermiculite, and you can even add some coffee to it to add an extra nitrogen kick. Mix your moistened coco coir and vermiculite at a 1:1 ratio, add in a little damp pasteurized coffee for added nutrition, and you’re ready to inoculate and grow.
Manure
This is a common substrate for growing button mushrooms, the most common mushrooms to find at the supermarket. While it’s possible to grow some forms of oyster mushroom on manure, it’s not recommended — oyster mushrooms prefer one of the other options listed above.
Watering Your Substrate
Before you inoculate, you need to make sure your substrate is properly prepared — and that includes making sure it’s holding all of the moisture it will need to grow your batch of mushrooms. While you may be able to lightly mist the exterior of your grow bag with water, the vast majority of the fungal growth will happen on what’s right inside that bag.
Chances are that your pasteurization process has given you plenty of water for the growth process, as long as you inoculate your medium immediately after it has cooled. A good way to gauge is by picking up a handful of your substrate. It should not be dripping. Applying a light squeeze, maybe a couple of drops of water will come out, and a forceful squeeze will give you a quick stream of liquid. If your medium is doing that, you have the perfect amount of water for growth, and should not need to add more.
If you’ve sterilized your mushroom medium, it too should have enough water in it (especially if you added the right amount to make your pellets turn to sawdust). You should be able to just inoculate that as it is. However, having a misting bottle on hand is a good idea, just in case you do need to add water as the mushrooms grow.
Inoculating Your Substrate
There are slightly different techniques used for inoculating your mushroom substrate depending on what the substrate is. Let’s go over the process for each growing medium and look at how it varies in depth.
Inoculating Straw
Once you have pasteurized your straw and it’s cooled off significantly, it’s time to blend in your mushroom spores.
While your spore source should have directions for how much inoculant they recommend using, a common ratio is about 3 pounds of spore inoculant to 20 pounds of straw. If you’re doing a much smaller quantity, you can scale this down, but you want to stay at approximately the same levels of spore to straw. Using a scale and a large plastic tub or tote, weigh out your straw and use the appropriate amount of inoculant for your straw’s weight. You may want to inoculate more straw than you think you will need!
Once you have everything measured out by weight, thoroughly mix up your straw and the inoculant, being sure to break up any clumped spores you find. Then, using poly bags or tubing, tightly pack your straw into the bags/tubing, being sure to pack it down very securely. You are essentially creating a rotted log for your mushrooms to grow on, so the tighter you can pack in the straw and spores, the better you are. Once your bag or tube is full, press out as much air as you can to cause it to pack tighter still, and secure the bag closed with string or a zip tie.
Once you have created your straw log, you need to sterilize something to poke holes in the bag’s exterior with. A sterilized Exacto knife blade is great for this (you can boil it or place it in the oven for an hour or two to sterilize it thoroughly). Neatly cut small X-shapes all over the bag’s surface to allow in a limited airflow to help your fungi to grow.
Inoculating Coffee Grounds or Coco Coir/Vermiculite
Inoculating coffee grounds is quite similar to inoculating straw, except that the ratio of mushroom spawn to coffee is slightly different. A good rule of thumb is about 500 grams of spawn to about 2.5 kilos (roughly 5.5 pounds) of used coffee grounds. Mix it in a clean bowl or tub until the inoculant is fully worked through the moist coffee grounds, and then make your grow bag. You can purchase filter-patch grow bags from some mushroom spawn sellers, or use the poly bags or tubes I mentioned for straw, again using a sterilized Exacto knife to cut tiny X-shapes in the bag’s surface. I highly recommend the filter-patch grow bags, as they tend to keep contaminants out very well and come with instructions as to how to fill them and prepare them for use.
The same rule holds true for coco coir and vermiculite blends, including those with coffee in them. It’s really a very simple process on the whole.
Inoculating Hardwood Sawdust Blocks
Since you’ve gone to all the trouble of making a sawdust block, the last thing that you want to do is to mess up that shape. So when inoculating these, often the grain spawn inoculant is carefully added to the grow bag, the bag is closed again, and then you shake it to distribute the fine grain spawn all over the exterior of the block. Alternatively, you can buy spawn in a liquid solution and inject it into the block using a needle. Either way works quite well.
Colonizing Your Oyster Mushrooms
You’ve done all the hard stuff — now you just need to make sure your oyster mushrooms have an ideal location in which to start to form. Ideally, this is a cool, clean, and dark area away from direct sunlight but which still has fresh air. Ideal temperatures for most varieties are 64-77 degrees Fahrenheit, although types like the blue oyster mushrooms can colonize at cooler temperatures.
And now, it’s time to wait. Initially, you’re waiting for the spores to colonize your substrate fully. This can take 7-21 days, depending on the conditions your grow bag is in and which type of oyster mushroom you are trying to grow. During this time period, the mycelium will be spreading through your bag, and once it’s spread, the entire surface of your substrate should be white in color. If it is, perfect, you’ve successfully colonized your medium and it’s time to convince your mushrooms to fruit!
If your substrate shows any signs of green mold, that’s where you may have a problem. That means that something has managed, despite your careful pasteurization or sterilization, to get into the grow bag and is competing with your mushrooms. Very small patches of green aren’t necessarily a problem, and can generally be combatted by poking a hole at the green spot and pushing in a small amount of salt on top of the green mold to try to kill off the opposition. If your entire substrate is green, you have failed, and you will not be growing mushrooms in that batch.
Coercing Your Mushrooms To Fruit
Your substrate is a white mass and it still feels damp when gently touched through the side of the bag. What’s next? Getting the actual fruit to grow! Think about the conditions in which mushrooms grow in nature — they like moist growth medium, shaded environments, and mild temperatures. That’s your goal here, too.
So now, it’s time to introduce a little bit of light. While you still don’t want direct sunlight, you want more light than you’d had previously. A windowsill or other indirect lighting source is good for this. At this point, you also want to cut a small hole in the bag, maybe 2″ across, and occasionally spray water via a misting bottle through that hole. While it shouldn’t be necessary if you properly hydrated your substrate initially, mushrooms love moist and humid environments, so extra water just helps to ensure success.
After about a week, you should start to see the first signs of fruit coming out of the sides of the bag through the holes you punched initially. That’s a good sign! The fruit should double in size every day, quickly becoming big and healthy oyster mushrooms. They will grow like this for the next 5-7 days.
When the edges of the mushroom caps start to curl upward, it’s time to harvest before they drop spores everywhere. Cut the stems at their base or twist the cluster to snap it off the bag, and allow your mushrooms to become dry to the touch on the surface. Then, place your mushrooms inside of a paper bag in your refrigerator for storage or cook them immediately. If you’re going to wait a little while before using your mushrooms, pack some paper towels around them in the bag to prevent moisture buildup that will cause the mushrooms to rot.
Don’t get rid of that grow bag yet, though. Often, you can get 2-3 flushes of mushrooms or possibly even more out of a single grow bag. Just keep ensuring that the substrate is moist, misting it to remoisten it if it’s not, and keep it in indirect light at a controlled cool temperature. You can get a lot of mushrooms out of a single colony.
Having Problems? Keep It Clean.
As mentioned earlier, if you begin to see any green mold in your grow bag during the colonization process, something else contaminated your batch. That means that you probably didn’t work in a truly sterile fashion.
To prevent problems like this, wash down all surfaces you’re working on and all containers you’re using with rubbing alcohol or a professional cleaner (something like Star-San or another brewery cleaning solution is ideal, as it’s meant to kill all manner of infection sources). Make sure your hands and arms are thoroughly cleaned before touching your substrate or your inoculant. Wear a mask to prevent coughing or sneezing into your batch, and take precautions to keep your hair tied back and out of the way. The cleaner the environment you can grow in, the better off you are… and the less likely you are to experience any problems.
Indoor growing of mushrooms tends to not create any pest issues, but if you do have any pests, it’s likely to be indoor types like spiders. While these shouldn’t be hard to eliminate just by keeping your growing space clean, you can also use normal spider-repellent options to keep them at bay. Just avoid adding anything on the surface of or inside of your grow bags, as that could negatively impact your oyster mushrooms.
Growing Oyster Mushrooms For Profit
Now that you’ve learned how to grow oyster mushrooms, you might be wondering why we don’t all grow them… after all, it’s actually a very simple process for what sells for a high price in the supermarket. You might even be considering whether you can make some money by doing it yourself.
Well, I’ve got some great news for you. With a little ingenuity and networking with local restaurants or farmers’ markets, you can in fact grow oyster mushrooms for sale. And you can do it for a surprisingly low initial cost.
If you are growing oyster mushrooms on coffee grounds, and you have a regular supplier in your local coffee shop, all you need is a cool colonization room and a source of indirect lighting for fruiting. You may be able to convert a spare bedroom into a mushroom habitat, in fact. If you don’t have a supplier for coffee grounds, large bales of wheat straw are inexpensive at feed stores, and if you have a weed-whacker and a large barrel, you can use that to cut up large quantities of straw into smaller pieces.
Your biggest cost outlay then will be in acquiring your mushroom spawn, and that’s not super-expensive. However, if you want it to be even less expensive, you can learn how to cultivate your own mushroom spawn, and make it a fully DIY process. The sky is the limit!
What To Do With Your Spent Substrate
One of the best things about growing oyster mushrooms – or any mushroom, for that matter – is that once you’ve gotten all the flushes of fungi out of the bags, you now have some rich organic material left behind. Don’t put that leftover white-tinged straw or coffee or sawdust in the trash can, because it can have a whole second life.
If you have a compost tumbler or a stationary composter, your spent substrate is ideal for turning into compost. In fact, it’s commonly done in the commercial growing industry, and then the subsequent compost is then sold as “mushroom compost”. This rich source of plant nutrition is a worthy addition to your garden. Even if you don’t have a normal compost pile, you can feed your spent substrate to vermicomposting worms, as they’ll consume it greedily and give you nutrient-rich worm castings as a result.
An added bonus of making mushroom compost: you can use old mushrooms to generate spores and maybe get another bloom or four of various types of mushrooms right on top of your compost pile. This only works if your pile is fully shaded, but you may be able to coax another batch or two of mushrooms out of your remnants.
Publicaciones relacionadas:
 Jardines de invernadero con camas elevadas: consejos y trucos
 Plantas complementarias de cebolla: Allium Allies
 Cuánto tiempo fermentar kimchi con kraut Source
 Consejos de interior de plantas de jazmín para plantas de interior felices
 16 especies invasoras vendidas en centros de jardinería que nunca deberías comprar
 Collar de perlas: tallos suculentos que te encantarán
 Alyssum: Cultivando la colorida flor de la alfombra
 73+ Heirloom Apples You’ve Probably Never Heard Of