
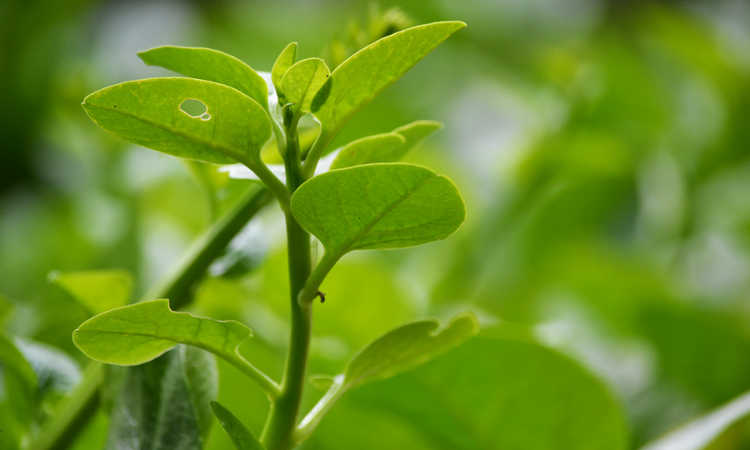
Spinach is one of the best cool-weather crops that you can grow. It produces huge yields of nutritious, delicious green leaves that are a worldwide staple in salads and most dishes you can whip up in the kitchen. But do you know how to grow spinach?
Rich in complex B vitamins, as well as vitamins K, A, and many more, spinach is one of the healthiest greens available to us. It’s rich in iron and manganese, and has a reasonable amount of fiber for a leaf vegetable. King of the salad greens, it is also a fantastic addition to most cooked meals, and can even be added to smoothies for an added vitamin boost.
Not only is it a phenomenal food, but it’s reasonably easy to grow, provided that you follow a few basic steps. So let’s talk about how to grow spinach, and the best ways to produce a big supply of this nutritional powerhouse!
Subscribe to the Epic Gardening Podcast on
Spinach: Quick Care Guide
| Common Name | Spinach |
| Scientific Name | Spinacea oleracia |
| Germination Time | 8-15 days |
| Days to Harvest | 40ish, varies by variety |
| Light | Full sun to part shade |
| Water | About 1” per week |
| Temperature | Cool-season, 60-75 degrees preferred |
| Humidity | Can tolerate some humidity |
| Soil | Well-draining, alkaline soil |
| Fertilizer | High nitrogen fertilizer and compost |
| Pests | Flea beetles, spider mites, aphids, cutworms, armyworms, leafminers, slugs, snails |
| Diseases | Downy mildew, powdery mildew, white rust, anthracnose, cercospora leaf spot, spinach blight, fusarium wilt |
Recommended Spinach Varieties
While there are many things that are called spinach, including some oddball things like chard, the spinach plant is known by the botanical name Spinacea oleracia. Believed to have originated in ancient Persia, it rapidly spread from there to India, then China, and then throughout most of the world.
Three basic types of spinach are currently being sold today. These are savoy or crinkled-leaf spinach, flat leaf spinach, and semi-savoy hybrid varieties.
Savoy Varieties
When you go to the supermarket, it’s likely that savoy spinach is what you’re going to see in the produce aisle. Savoy types tend to have a crinkled or curled leaf shape, and work beautifully for fresh eating.
| Variety | Growing Time | Description | Where To Buy |
| Bloomsdale | 50 days | Heirloom savoy variety from 1925, extremely popular. Cold tolerant. | Buy Seeds |
| Escalade | 43 days | Mild flavor, upright habit, mildew resistance, and a reluctance to bolt. | Buy Seeds |
| America | 43 days | Thick green leaves perfect for freezing, canning, or fresh use. | Buy Seeds |
| Palco | 38 days | Quick-growing savoy type. Bolt and disease-resistant. | Buy Seeds |
Flat-Leaf Varieties
While these spinach varieties look much different from the savoy due to their smooth, uncurled leaves, they are still spinach! Easier to clean than savoy varieties, the flat leaf spinach types are often used for processing into frozen or canned spinach. They also work well in other cooked applications where the leaf shape isn’t as identifiable.
| Variety | Growing Time | Description | Where To Buy |
| Red Kitten | 40 days | Medium green leaves with red stems. High resistance to downy mildew. | Buy Seeds |
| Akarenso | 50 days | Slightly serrated Japanese spinach variety with red-purple stems. Mild flavor. | Buy Seeds |
| Baby’s Leaf | 40 days | Lots of leaf, very little stem. Early producer. Easy to clean. | Buy Seeds |
| Renegade | 42 days | Succulent, round dark green leaves. Hybrid variety with consistent growth. | Buy Seeds |
| Giant Nobel | 48 days | Heirloom from the 1920’s. Extremely large plant, spreading habit. Slow bolt. | Buy Seeds |
Semi-Savoy Varieties
Hybrids of the flat-leaf and savoy spinach types have produced a semi-savoy. It has some of the easier-to-clean benefits of flat leaf varieties, but works well in both fresh and cooked uses.
| Variety | Growing Time | Description | Where To Buy |
| Kolibri | 29 days | High downy mildew resistance, quick growing. Great for baby leaf production. | Buy Seeds |
| Seaside | 40 days | Resistant to heat bolting, semi-smooth leaves. Downy mildew resistant. | Buy Seeds |
| Responder | 42 days | Strong germination. Disease-resistant with uniform growth, great flavor. | Buy Seeds |
| Carmel | 25 days | Quick-growing, very uniform spinach with high downy mildew resistance. | Buy Seeds |
| Okame | 50 days | Slow to bolt and can take hotter temperatures. Downy mildew-resistant. | Buy Seeds |
| Crocodile | 45 days | Extremely heat resistant. Great as both baby leaf and mature. | Buy Seeds |
Other “Spinach” Types
These other plants are often confused with Spinacea oleracia and referred to as spinach. While they may be similar in how they’re used culinarily, they aren’t the same plant. However, they can be quite popular. Seeds for these plants are often found alongside spinach seeds in catalogs or online.
Chard, also known as Swiss chard, is often called “beet spinach” or “perpetual spinach”. While unrelated, it is often grown for its leafy greens as well, although the stalks can also be consumed.
Malabar spinach (Basella alba or Basella rubra) is sometimes referred to as vine spinach. While not an actual spinach, it has a spinach-like flavor to its leaves and can tolerate hot weather extremely well.
Strawberry spinach is a common name for Blitum capitatum, also known as Chenopodium capitatum or strawberry blite. This plant produces edible leaves, but is often grown for its bright red edible fruit.
Red Aztec spinach (Chenopodium berlandieri) is widespread as a weed plant. More commonly known as red lamb’s quarter or goosefoot, this particular plant produces edible leaves. It’s not a true spinach, but it has a similar flavor when cooked.
Planting Spinach
While it may seem simple to plant spinach, there’s a limited window of time which you should plant in. Here’s when, where, and how to plant your spinach for optimal growth conditions.
When To Plant Spinach
Early spring and in the fall are the two times of year when spinach is most likely to come to full maturity before bolting. Hot weather will rapidly cause most spinach plants to turn to seed production, which reduces the quality of the leaves for eating purposes.
Planting your seeds as soon as the ground can be worked in the spring is the best way to get a full crop before the weather starts to get hot. You can actually plant before the final frost in most areas, but the seeds won’t germinate unless the soil temperature’s above 40, and it may be a slower growth process.
If you want to have a consistent harvest and are in an area where a long, cool spring is likely, you can sow more seed every ten days or so to maintain regular new growth. Be sure not to crowd your plants.
In many parts of the world, a second fall crop is also possible, and most spinach is somewhat frost-tolerant. Depending on your typical weather conditions, you can sow fall crows from August through September and harvest well into the latter portion of the year.
Those who are in temperate California or other warm environments can actually grow spinach from fall all the way through winter and well into the spring!
Where To Plant Spinach
It’s best to plant your spinach in an area with well-drained soil that’s been worked at least a foot deep to relieve soil compaction. Spinach will grow well in raised beds, planters, or directly in the ground.
However, it’s important to note that spinach seeds do not germinate well at soil temperatures above 85 degrees Fahrenheit. As raised beds can increase the soil warmth quickly, be sure to check your soil temperature before planting. Also, pick a location where you can guarantee reasonably cool temperatures for the growing period, as this will help prevent bolting.
Spinach can be planted in most areas of the yard which get at least six hours of sunlight per day. If you have slightly-shady areas, that’s fine, but it’ll readily accept lots of sun, too.
How To Plant Spinach
For most spinach varieties, it’s recommended to plant in rows that are spaced 12″ apart. Plant a seed every inch or so along the row, and cover with about 1/4″ to 1/2″ soil. As the young plants come up, assess the young plants for hardiness and thin to 4-6″ apart.
If you’re growing to harvest baby spinach, you can seed a bit closer together and more aggressively, even broadcast seeding with 1/4″ of soil added over the top afterward. Thin it to at least 3″ apart and harvest as the plant reaches 5-6″ in height.
Be careful: crowding spinach plants will result in weak plants, stunted growth, and quick bolting. Whenever possible, avoid overcrowding!
Caring For Spinach Plants
In the right conditions, spinach is a very hardy plant. But if the conditions are wrong, your crops will suffer. Let’s go over the best conditions to provide for optimal growth.
Sun and Temperature
Full sun to partial shade is recommended for spinach. It can grow in shadier conditions, but it should receive no less than six hours of full sun per day for plant development.
Conditions between 60-65 degrees Fahrenheit are just about perfect for spinach growth. While some varieties of spinach are surprisingly cold-hardy and can handle chills down into freezing temperatures, their leaf production greatly slows down as the temperature drops.
Similarly, overly warm conditions will tell your spinach that it’s time to produce seed and prepare to die of heat exhaustion. They can quickly bolt, resulting in bittered leaves and failing plants. Once the weather gets consistently over 85, your spinach is not going to be happy. You can sometimes provide shade cloth through the heat of the day to reduce the ambient temperature around your plant, but it won’t work for long.
Watering
Consistent moisture is important for spinach. Most plants will send down one deep taproot and a multitude of other thinner roots. The taproot will search deep in the soil for water, but the rest of the roots need moisture too!
About 1″ of water per week is ideal for spinach, but in slightly warmer weather you may want to bump that to 1.5″. Regular, shallow waterings are better than one heavy watering. Slow-drip irrigation or soaker hoses are great for these plants.
Soil
A few days to a week prior to planting your spinach, work some compost and a slow-release, high-nitrogen fertilizer into the soil where you’ll be planting. This will get your plants off to a good start. With this plant, it’s best to prepare in advance rather than risk weak plants.
Well-draining soil is essential for your spinach plants, as they won’t tolerate much standing water. They also prefer soil that’s slightly alkaline, in the 7.0 or slightly higher range.
Fertilizing
As mentioned in the soil segment, much of your fertilization comes from the initial soil preparation process. However, once you’ve planted seeds and they’ve sprouted, watch for them to form at least four leaves. Once there are four young leaves there, you can add an extra dose of a high-nitrogen liquid fertilizer around the base of your plant.
You can side-dress with slow-release granular fertilizer in lieu of liquid fertilizers. Do so with caution, and be sure that none of the granules touches the plant or the root structure. The higher nitrogen content in these fertilizers can cause scorching. These fertilizers should be worked into the top inch or so of the soil a few inches from the plant itself and should be thoroughly watered in.
Pruning
Typically, the only pruning you need to do for spinach is to harvest the leaves during its season. Spinach is an annual plant; once it has gone to seed, its lifespan is essentially over, and other than potential harvesting of the seed the plant can be removed.
Like many other leafy vegetables, it’s advisable to regularly harvest leaves from the plant to encourage faster and bushier growth.
Propagation
Unlike many other green plants, spinach does not grow from cuttings, as the leaves and stems will not form new roots.
You should plant from fresh seed under a year in age. Spinach seed can be stored for a few years in normal seed storage options, but the tiny seeds lose their ability to germinate when they get too old. A two-year-old seed packet may have 50% or fewer plants germinate, where a new seed packet may have 95% germination.
Transplanting
It’s possible to transplant spinach… I just don’t recommend it if it was initially grown in a container!
Due to the long taproot that the spinach plant produces, it can quickly outgrow any starter containers. The taproot will continue trying to grow downward, and it can spiral around inside its container.
It’s better to just plant your spinach directly in the soil as seed and allow it to develop normally. As you’re thinning the plants, you may be able to carefully coax the extra plants out and replant them elsewhere provided that you get the entire root mass, thereby increasing the number of spinach plants that you have.
Harvesting and Storing Spinach
Once you’ve got a bunch of spinach plants, it’s definitely time to start harvesting your produce! But how do you harvest spinach for the best taste, and how long can you store it for? Let’s talk about that.
Harvesting Spinach
As soon as your plant has a reasonable number of leaves, you can begin to harvest. Many people prefer to wait until their plant has developed some good leaf growth, but spinach can also be grown as a sprout or as microgreens.
To harvest baby spinach leaves, wait until it’s formed a rosette of at least five to six leaves, and then harvest. You can opt to either cut the stems off slightly below the leaf, or to snip off the entire top of the plant. If you remove all of the leaves, the plant will not grow to maturity, so if you plan to harvest baby spinach, regularly re-sow to maintain steady production.
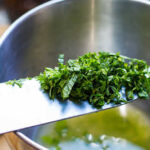
Older spinach plants can be harvested by snipping off the leaves at the stem with a pair of garden scissors. You can also opt to use a thumbnail to slice through the soft stems. Be sure to leave at least a portion of the leaf stem on the leaf as removal of the stem will cause the leaf to wilt more quickly.
Be very gentle while harvesting your spinach. The leaves can bruise easily, and bruising will cause them to decline faster.
It’s advisable to not wash your spinach immediately after harvest if you are going to attempt to store fresh spinach. Wash it just before use to prevent bruising or leaf breakage.
To clean it, fill a large bowl with cool water and place your spinach inside. Dunk it repeatedly under the surface of the water, then gently drain the spinach and refill the bowl. Repeat until no dirt or debris is visible in the water or in the bottom of the bowl.
You can use a salad spinner to dry your spinach or simply drain it thoroughly in a colander and then spread it out to dry in a cool, well-ventilated space. Do not store your spinach while it’s still wet, as that will rapidly accelerate its decay.
Storing Fresh Spinach
Once picked, you’ve started the clock – fresh spinach does not keep well or for very long. Discard any damaged or discolored leaves, and get them into the refrigerator quickly.
If you’ve left a reasonable amount of stem on your leaves, you can use the stems to help bundle the leaves together. Place the cut ends into a paper towel to help absorb any excess moisture, and store your spinach in a plastic bag in the refrigerator. Removing any excess air from the bag will help reduce the potential of moisture buildup inside, too.
Stored this way, your spinach may be stored in the refrigerator at a temperature of 41-48 degrees for around ten days. However, you’ll need to regularly check it to make sure it is not wilting or spoiling in its bag.
You can also preserve your spinach for later use by freezing, canning, or drying it.
Freezing Spinach
To freeze spinach, begin by thoroughly washing the leaves. Once they’re clean, remove any damaged, wilted, diseased or discolored leaves, and then dry the spinach leaves completely. A salad spinner can take off most of the moisture, but you can also blot off extra moisture with a towel.
If you plan on using your spinach within six months’ time, you do not have to blanch it before freezing. Simply place your washed and dried spinach leaves into a freezer bag, pressing out any excess air, and place it directly into the freezer. Larger leaves can be torn up if desired.
You can actually cram as much spinach into the bag as you can fit – as this spinach will only be used for cooking purposes, damage to the leaves is not going to be noticeable later. When reusing, you can just pull out handfuls of spinach and add it to whatever you’re going to cook.
For long-term freezer storage, blanch your spinach leaves before storing. Don’t blanch with boiling water as this will draw out too many of the nutrients and flavor of the leaves. Instead, place your greens into a resealable bag, and place them in the microwave for one minute, then directly into the freezer. Be sure to remove any excess air in the bag before freezing!
You can also blanch the spinach by steaming the greens for about one minute if you don’t want to use the microwave.
Canning Spinach
Spinach is a low-acid food, so must be canned with a pressure canner to avoid the risk of botulism.
Clean your spinach thoroughly, and discard any discolored, insect-damaged, diseased, or wilted leaves. If there are any tough stems, remove them. Then, place about a pound of spinach at a time into a cheesecloth bag and steam it until it’s thoroughly wilted.
Loosely fill your sterilized jars with the wilted greens and add boiling water, leaving about an inch of headspace. You can add salt if you want (about a quarter teaspoon per pint). Can as per your pressure canner’s instructions.
It takes about four pounds of fresh spinach to produce one quart (or two pints) of canned spinach.
Drying Spinach
Spinach can also be dehydrated or freeze-dried. This tends to make the spinach quite brittle, so if you opt to do this, you should expect that you won’t be able to rehydrate the spinach into full leaves. However, for spinach bits to add to soups, or for powdered spinach to add to smoothies or other recipes or to make baby food from, this works extremely well.
To dry your spinach, follow the manufacturer’s directions on your dehydrator or freeze dryer. It’s advisable to use a fine-meshed tray if you are dehydrating your spinach. Freeze dryer trays tend to be solid, so any smaller pieces will not fall through the tray as they will on a dehydrator.
Troubleshooting Spinach Problems
As long as you’ve followed the steps mentioned above, you should be able to grow a good crop of spinach. But what about those unforeseen circumstances? Learning how to grow spinach will also require you to be ready for these potential issues.
Growing Problems
If you’re having germination problems, there are a few possible causes for these. Seeds that are buried too shallowly or too deep can fail to germinate – aim for 1/4″ to 1/2″ planting depth.
Weather conditions may also be to blame. If the weather is too hot, seeds won’t germinate, and if it’s too cold, they may germinate much more slowly.
Finally, keep your soil evenly moist, as too little or too much water can also stop germination. You really want well-draining soil that isn’t too soggy, but that also can hold some water for the plants to use.
Yellowed leaves can indicate nitrogen deficiency. Spinach is a heavy feeder! Side-dress your plants with compost tea or a nitrogen-rich liquid fertilizer regularly, and be sure to work ample amounts of compost into your beds before planting.
Plants that bolt to produce seed are suffering from weather that’s just simply too warm. If you plant too close to summertime, it’s common for your spinach to go from seedling to seed stalk without producing many leaves at all. To prevent this, be sure to plant during the cooler months of the year.
Pests
Flea beetles will eat holes into your leaves, and if not stopped quickly can skeletonize the leaves entirely. That doesn’t make for a good spinach harvest! Use a spinosad spray like Monterey Garden Insect Spray to wipe them out.
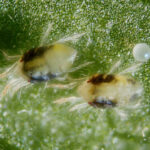
Both spider mites and aphids will suck the plant saps from your spinach leaves, leaving them withered and yellowing. Aphids are also a vector for diseases, and can spread things like spinach blight to your plants. Use neem oil to eliminate both of these sucking pests and to keep them at bay.
The cutworm can be a dangerous pest. These moth larvae will munch right through the base of young plants, causing them to topple over and die. Bacillus thurigiensis is the answer to these little caterpillars. Monterey BT is a spray that uses this natural product to kill off cutworms quickly.
Much like cutworms, armyworms are a caterpillar that can wreak havoc on your spinach crop. Thankfully, Monterey BT will help with these and other forms of moth larvae as well.
Leafminers are another larval form that will cause major damage to your spinach. These tiny larvae will eat little paths inside the leaves themselves, leaving visible patterns of scarring on the plant. The leafminer can be dealt with by using spinosad sprays much as flea beetles can, so get some Monterey Garden Insect Spray for these too.
Finally, we come to the slugs and snails. Common in most gardens, these little guys find spinach to be delicious just like we do, and will chew through leaves and plant stems. I use Garden Safe Slug & Snail Bait to lure them away from my plants. When they eat the poisoned bait, they die off and leave my plants safe from harm. There are also some great DIY pest control methods that work against slugs and snails!
Diseases
One of the most prevalent spinach issues comes from the formation of downy mildew. This mildew develops in wet or humid weather and can be hard to control. Yellow or white patches may form on the top of leaves, while a greyish fungus appears on the underside.
It’s best to avoid downy mildew by ensuring good airflow around your plants and by watering the soil rather than the leaves. If necessary, use a copper fungicide to treat the problem.
Powdery mildew can also become a problem on spinach, but it can be treated with repeated applications of neem oil. However, you will want to discard damaged leaves rather than eat them.
White rust can often be confused with downy mildew. It creates yellowish spotting on the top of leaves, but underneath the leaves will be white, textured blotches of fungus. This can sometimes be treated with liquid copper fungicide.
Anthracnose and cercospora leaf spot can both cause blotches and spotting on leaves. Both of these can cause black, brown or yellow splotches to appear, and as the spots spread, they cause the plant to fail. You can treat both of these problems with copper fungicide.
Spinach blight is another name for the cucumber mosaic virus, which is spread by cucumber beetles and aphids. This can cause leaves to twist and curl inward, which is hard to notice on some varieties of spinach, but it also can cause yellowing of leaves and plant death. Growing resistant varieties and preventing aphids on your spinach are both essential protections. Plants that have spinach blight should be removed and destroyed.
Finally, fusarium wilt is another fungal disease like spinach blight which can be transmitted by cucumber beetles or aphids, but which also can live in the soil. Plants which yellow on one side, or which are experiencing stunted growth, may be affected by fusarium. Remove any diseased plants and destroy them. Remain watchful for other plants with similar problems.
Frequently Asked Questions
Q: Are there good companion plants for spinach?
A: Absolutely! Radishes are one great option. These can be planted around the base of spinach plants and tend to do quite well tucked in there. Other good cool-weather choices include cauliflower, celery, cabbage, peas, or strawberries. Tomatoes, eggplant, and peppers are also good plants near your spinach.
Q: It’s starting to snow. Will my spinach die?
A: Most spinach is somewhat cold-hardy and can survive cooler temperatures, but it won’t tolerate hard freezes. If the temperature is cold enough that it’s snowing, you should protect your plants with a cold frame. Generally, anything below 40 degrees is best protected from the chill in the air, and with a cold frame you can extend your growing season quite a bit. Adding some form of heating element in the cold frame (like a string of lights) may help you grow spinach all the way through the winter months!
Publicaciones relacionadas:
 Cómo cosechar menta y almacenarla para más tarde
 Cosecha de papas: cómo saber cuándo están listas sus papas
 Los ácaros araña: Insectos plaga que tejen telarañas
 La COB LED Grow Light explicada y revisada
 Aerosol de piretrina: un pesticida orgánico con historia
 ¿Qué es el suelo? Una introducción a lo que es y no es
 Tipos de maíz y por qué los amamos a todos
 Cómo cultivar lechuga todo el año