

Did you know okra is actually a fruit? Growing okra is surprisingly simple, and it’s a great addition to your cooking. We eat okra, or the lady’s finger, in many ways: raw, cooked, roasted, or pickled. However, despite looking quite similar to other green vegetables, the pods contain seeds that definitely categorize it as a fruit.
It may not have the sweetness of an apple, but okra sure has many fans across the world. If you fancy superfoods, okra is one of the best foods to enjoy. Enjoy a good break from kale and spinach, and spice up your salads with delicious raw okra.
Ladies’ finger plant has a long history. It was cultivated during the ancient Egyptian era that can be traced back to the 12th century BC. Okra seeds can be toasted and are often used as a coffee substitute. In the south, it’s an essential component to good Cajun cuisine.
We’ve got an abundance of information about this southern staple. Please keep reading to learn more about this fruit and find out how to grow it in your garden!
Quick Care Guide
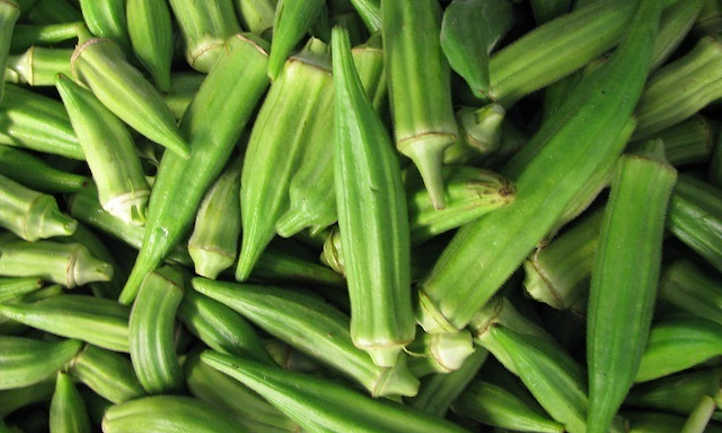
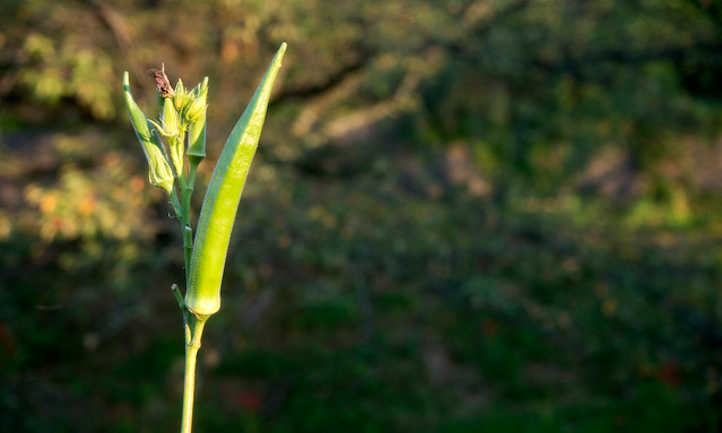 Growing okra ensures you always have a source of this Southern staple! Source: alcides OTA
| Common Name(s) | Okra, ochro, ladies’ finger |
| Scientific Name | Abelmoschus esculentus |
| Days to Harvest | 48-75 days to maturity, pods form fast after that and are harvested every 1-2 days |
| Light | Full sun |
| Water: | 1″ per week, more in hot weather |
| Soil | Well-draining sand & loam mix, rich |
| Fertilizer | Side-dress as described below |
| Pests | Aphids, whiteflies, corn earworms, stink bug, root knot nematode |
| Diseases | Anthracnose, rust, powdery mildew, fusarium root or stem rot |
All About Okra
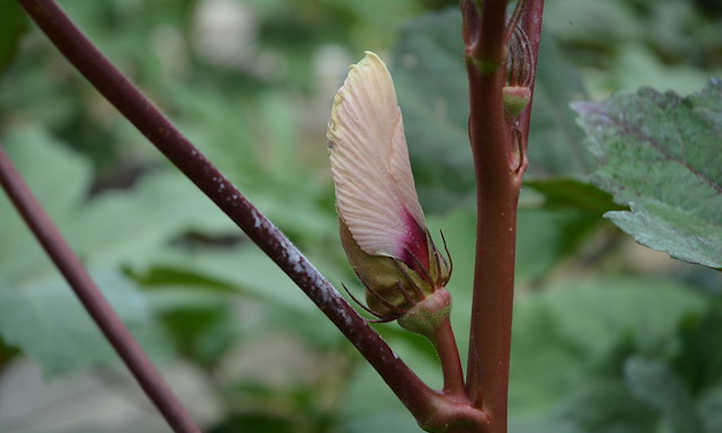 The okra bud is quite beautiful even before it blooms. Source: agrilifetoday
Okra plants are known by their botanical name, Abelmoschus esculentus. In many countries, okra is occasionally referred to as ochro or ladies’ fingers. The pods are long, slender, tapered, and curved at the end, just like a lady’s actual finger.
This species is believed to have originated in Ethiopia. The largest production of okra is currently located in India and Nigeria. In addition, it is widely grown in southeast Asia, Pakistan, and the Middle East in Saudi Arabia and Egypt. Okra is also commonly grown in Sudan, Benin, Cameroon, and Mexico.
Okra is an annual plant that’s herbaceous in nature. It is mostly grown for its edible pods. Typically it will grow to heights of 4-6 feet and can be a great addition to any garden.
It can be grown directly in garden beds or in pots. Unlike vining plants, okra has erect stems that grow out like a tall shrub. The stems are mostly hairless or bristly with unique leaves. Its lovely leaves are heart-shaped and grow as long as 4-8 inches. Each leaf has 5-7 lobes.
The okra plant can grow 4-6 feet tall, and produces vibrant okra flower blossoms that have yellow to white petals. Okra pods can grow as long 7-10 inches and are long and tapered towards the blossom end. The pods have a mild, earthy taste, almost like that of an eggplant, and are green or red in color.
This shrub-like species has a single deep taproot. The taproot provides more nutrients than the lateral secondary roots, although those fine hair-like secondary roots are useful for moisture absorption. An annual, it typically produces heavily for its short season-or-two lifespan and then dies off.
Okra matures within 50 to 65 days after being planted. It then bears seed pods for the next 10-12 weeks or even until frost. There are quite a few popular varieties of okra, including Blondy, Clemson Spineless, Cajun Delight, Baby Bubba Hybrid, and Burgundy.
Planting Okra
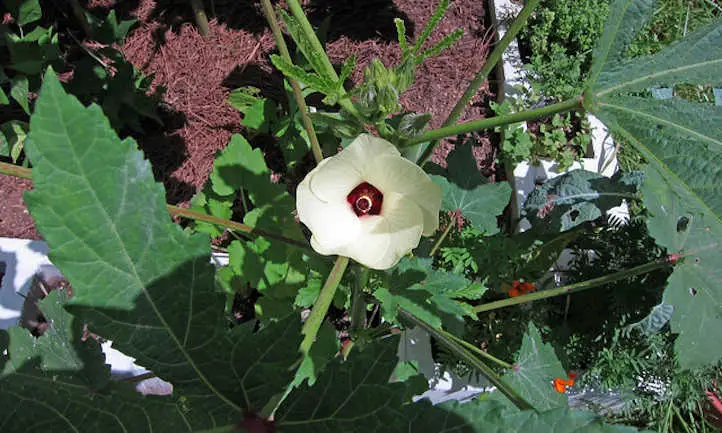 Okra flowers are rather large and quite visually appealing. Source: Awesome Joolie
But how do you care for okra or encourage it to develop those luscious pods? Let’s talk about growing okra in your garden and how to get it off to a good start.
You can start okra seeds indoors up to a month in advance of warm weather. For most in the United States, that’s spring to early summer. If you’re past the first frost, you can plant okra seeds directly in the garden bed, which is usually ideal. Okra is not a fan of being transplanted, as it often loses its tender secondary roots in the process.
While you can find seedling starts, they’re usually quite young to enable the best chance of transplanting. These should go into the garden only when the risk of frost has passed entirely. If you’re starting your own, try peat pots or our Epic 4-Cells!
That tricky time of year when there’s an occasional unanticipated frost shouldn’t prevent you from starting your seeds. If they’re direct-sown, you can grow okra underneath a cold frame or in a poly-tunnel to provide added warmth to protect your young plants.
Young okra plants need full sun conditions and will not perform in partial to full shade areas. Be sure to select a location for your plants where they receive the light they need. In addition, they’ll need protection from high winds as they can be easily damaged.
Spacing should be 12 to 18 inches apart for best growth. Once they’re in place, try to avoid damaging their fine secondary root system. Add a stake for extra support when the plant is young, as the root system will grow around it.
Avoid planting okra in the same soils where tomatoes or eggplants were previously planted. They’re susceptible to the same types of fungal wilts, and those fungi can live in the soil for years.
Before you sow them, soak your okra seeds for at least 12 hours. This allows them to rehydrate in preparation for going into the soil. Place okra seeds a half inch deep in a good quality garden soil blend, covering them gently.
If you want to container grow okra, the best option is to prepare the size of pot you’ll need for your full-sized plants and sow your seeds directly into them. Sow 2-3 seeds a half inch deep in the pot. Once they come up, select the healthiest plant to keep and pinch off the weaker two. Knowing how to grow okra in pots is essential if your sunlight moves around during the day, as you can move around your plant to follow the sunlight that way.
Warm weather is necessary for good germination. Your plants will need to be spaced at least 12 to 18 inches apart for airflow around the plant, but the warmth is perhaps even more essential for development. Floating row covers over your garden will help keep pests at bay.
Finally, no matter where you’re growing these, remember that they do put down a very deep taproot. Be sure there’s nothing like landscaping fabric underground that can block the root’s development!
Caring for Okra Plants
 Okra should be harvested when the pods are still fairly small. Source: Joi
Still confused about how to grow okra? Don’t worry; we are about to go over more specifics. So let’s break down each condition you’ll need to know to ensure you’ve got a good grasp on how to grow okra pods to harvest!
Sun and Temperature
Okra is a total sun worshipper. It needs warm temperatures, typically above 80 degrees F in the daytime, for the best plant development and those yummy seed pods.
While it can tolerate temperatures in the 50s and 60s at night, it’s almost tropical in its desire for warm conditions! Not at all tolerant of frost, it’s essential to provide frost-free conditions at all times, so you don’t end up with dead okra.
Full sun is an absolute necessity. A minimum of 8 hours is required to ensure your okra’s continued health.
Water & Humidity
Particularly during the heat of the summer, your okra is going to need water to survive. Most of the time, an inch of water per week is fine, but in extreme warm conditions, you should water a bit more often. Try to water early in the morning to ensure that any leaves you might accidentally hit will dry fully in the sun.
Okra plant wouldn’t have become the Southern cooking staple that it is if it weren’t humidity-tolerant. These plants don’t mind if it’s a bit swampy out! Having said that, it’s still important to water them at their base, not watering the leaves. This reduces the likelihood of mildews forming on the leaf surfaces. A soaker hose can really help with watering.
Mulch heavily at the base of the plant. Not only will this help keep moisture in the soil, but 3-4” of mulch will also reduce weed growth.
Soil
Okra appreciates a fertile and well-drained sand-loam soil blend. This loose and rich soil will allow for deep taproot penetration as well as enable the fine secondary roots to spread.
Blend in a plant-based compost or composted cow manure or horse manure to provide extra richness to your soil prior to planting. This provides a good starter food for your plant while it’s initially developing.
Okra likes a little bit of acidity in its soil but can tolerate something more neutral. Aim for a pH range between 5.5-7.0 in your soil for good growth. If you’re uncertain of your soil pH, pick up a good pH test kit to check the range.
Fertilizing Okra
Side-dress your plant with a nitrogen slow-release fertilizer when it reaches about 8” in height and again a few weeks later. This promotes good plant development. If it’s got plenty of compost, you may be able to skip this early fertilizing stage.
Once plants have reached 4 feet tall, side-dress the plants once with a balanced, slow-release 10-10-10 organic fertilizer. After that, avoid giving them too much of a good thing because too much fertilizer will produce lots of foliage and few pods!
Pruning Okra
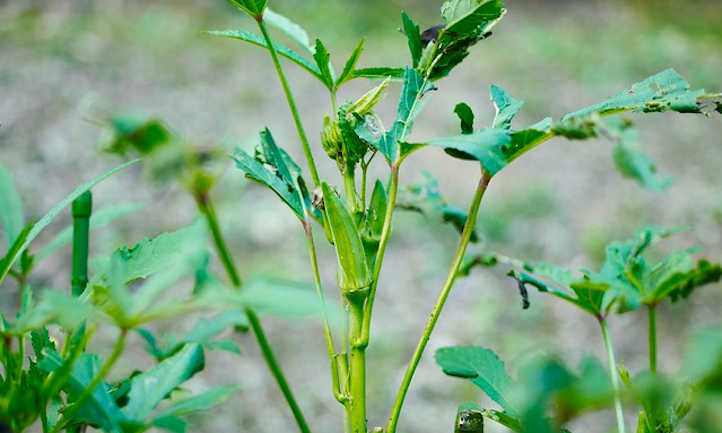
 Plants with lower branches removed will flower and fruit quickly. Source: skvidal
A lot of southern old-timers talk about “whooping” their okra during the growing season. This old technique used a long switch to strike along the stem of the okra, knocking off lower branches and stressing it. The idea behind the technique was that by stressing the okra, it would produce more.
Strangely enough, this old method works, but you don’t need to go find the perfect wooden switch just yet!
As your okra reaches at least 3-4 feet in height, start snapping off lower-growing lateral branches. This focuses the okra’s attention on fruit development higher up on the stem. It also reduces the likelihood of fungal spores splashing up onto lower leaves.
Wear long sleeves and gloves when you’re pruning your okra. Many varieties have hairy spines along the stems that can cause skin irritation. While you don’t have to use pruning shears to remove the lateral branches, you can if you’d like.
Okra Plant Propagation
Okra plants are mostly propagated by seed, but cuttings can also be an effective method.
Soak seeds for at least 12 hours to allow them to rehydrate. Sow seeds a half inch deep, 12-18 inches apart. Be sure you’re sowing seeds after all threat of frost is gone.
Fresh stem cuttings can also be used. You’ll want a cutting that’s about 8” in length from a very healthy plant. Strip off lower leaves, only keeping a few at the very tip. Dip in water, then a powdered rooting hormone, and place into a pre-moistened potting mix. Keep the humidity up around your young cuttings, but caring for your cuttings is similar to other plant species.
Harvesting and Storing
 Okra pods are a tasty vegetable to add to your produce rotation. Source: NatalieMaynor
So now you know how many inches apart to plant your okra, what the soil type is, and other important details. But how do you know when to harvest okra? Let’s talk about that!
Harvesting Okra
For most okra varieties, harvest when the pods are 2-3 inches long. Use a sharp knife to cut through the stem just above the top of the pod. If it seems difficult to cut through the stem, the pods may have become woody. Do not pull pods off, as it causes damage to your plants.
Wear long sleeves and sturdy gloves when harvesting okra to protect yourself from the spines on the plant. Some spineless varieties do exist, but most okra has spines on the stems that can irritate your skin.
Harvest okra every other day to keep the plants productive.
Storing
Okra pods can bruise or rot quickly after harvest, so it’s important that once you harvest yours, you process them quickly. You can store them in the refrigerator for up to two days before they start to go soft.
For longer-term storage, rinse off and pat dry your okra harvest. Once dry, store them in freezer bags. You do not need to blanch or cut the okra before freezing, and in fact, it lasts longer whole!
Canning okra using a pressure canner is another option. You must use a pressure canner for safe processing as a low-acid plant.
Pods can also be fried, then dehydrated to make a crunchy and delicious snack.
Troubleshooting
 Some okra is red in color rather than green-podded. Source: alcides OTA
So now that you know how to care for it, let’s talk about problems you may encounter. These won’t ruin your harvest if you act on them quickly to remedy the issue!
Growing Problems
One of the most common growing issues for okra is flowers and buds drooping or falling off before fruit set. A temperature issue almost always causes this. Temperatures over 95 or below 55 degrees Fahrenheit cause this. In addition, pollination during those temperatures will also be reduced, which will also cause plants not to produce. Avoid temperature fluctuations whenever possible and provide protection for your plants during extremes.
If pods are woody and tough, they’ve been left on plants for too long. Try to harvest when your pods are 2-3 inches in length.
Pests
Okra is vulnerable to several pests, some of which are easier to combat than others.
Both aphids and whiteflies suck sap out of okra leaves. Treatment for both of these pests is relatively simple. A spray of neem oil should eliminate the majority, but if an infestation still persists, an organic pyrethrin spray can be used.
The corn earworm is a hairy little caterpillar that will rapidly defoliate your plants. Bacillus thuringiensis sprays are effective in taking these out, as are organic spinosad sprays.
Southern green stink bug is common in the south. These suck sap directly out of the okra pods, causing them to become twisted or deformed. Insecticidal soap is effective on these.
Finally, the root knot nematode is a pest that causes a condition called root knot or root nodules. Fight these by applying beneficial nematodes to your garden and practicing regular crop rotation. The beneficial nematodes will attack the root-harming ones and eliminate them.
Diseases
Anthracnose is a fungal disease that causes black, water-soaked spotting on leaves and can also cause stem damage. Copper fungicide sprays are usually effective against this and other leaf spot diseases. Remove damaged foliage from infected plants before spraying.
Rust is also treatable with copper fungicide. Most common in humid regions, it causes black or rust-colored pustules or blisters to form on leaf or stem surfaces. Remove damaged foliage before spraying with the fungicide to prevent further spread.
Powdery mildew is common in humid weather, particularly if the leaves have gotten damp. Neem oil is effective at keeping this issue at bay. If it still persists, apply a biofungicide or copper-based fungicide.
Finally, fusarium root rot or stem rot is a soilborne disease that will cause plant stunting, root decay, and severe yellowing or wilting of the plant. This disease can be complicated to combat, but some forms of mycorrhizae are effective at reducing the spread of fusarium. Do not overwater plants.
Frequently Asked Questions
Q: How long does it take for okra to grow?
A: It can take anywhere from 48-75 days for okra to mature, depending on its variety. After that, it produces for at least 10-12 weeks, or until weather conditions become too cold for it.
Q: Does okra need a trellis?
A: Not necessarily. Okra plants don’t need a trellis as they tend to grow in the form of tall shrubs, not vining plants like zucchini or beans. A stake can be used to provide some support to the main stem.
Q: Does okra come back every year?
A: Okra is an annual and should not come back on its own. If a pod has spilled seed onto the soil, the seeds may germinate in the garden bed. Harvesting pods as they reach ripeness will prevent accidental seed drop.
Q: What is the best month to plant okra?
A: Since okra appreciates hot weather, you’ll want to plant substantial starts in late spring or right at the beginning of summer, depending on the region you’re in. Usually, this occurs in April or May.
Q: What can you not plant near okra?
A: Bad okra companions include eggplant, certain summer squashes, and a few other cucurbits. Unless you’re growing melons or cucumbers, keep cucurbits away from okra, as it tends to attract some pests.
Q: How many okra will one plant produce?
A: Although it’s slow to start, once your plant begins producing, it will grow 20 to 30 pods per okra plant.
Q: Can you plant tomatoes next to okra?
A: Although other nightshades do poorly next to okra, tomatoes do very well!
Publicaciones relacionadas:
 Vermiculita: mineral que retiene la humedad
 Compost vs Fertilizantes: ¿Cuál es la diferencia?
 Cómo cultivar azafrán: la especia más cara
 Beneficios de la jardinería para la salud mental: el toque curativo de la naturaleza
 Aeonium Kiwi: cómo cultivar el Lovely Tricolor
 ¿Los girasoles son anuales o perennes?
 Growing Rhubarb: Pretty Pieplant, Poisonous Leaves