
I love my soaker hoses! They are a godsend for good watering, enabling me to easily direct the water directly to where it’s needed without any headaches. But you have to know how to use a soaker hose properly to make it an effective option for you.
Let’s talk about what’s entailed in setting up your soaker hose, where it should go, and how often you need to run it for best coverage. There’s a lot of ground to cover (so to speak), so let’s dive right in!
Subscribe to the Epic Gardening Podcast on
What Is A Soaker Hose?
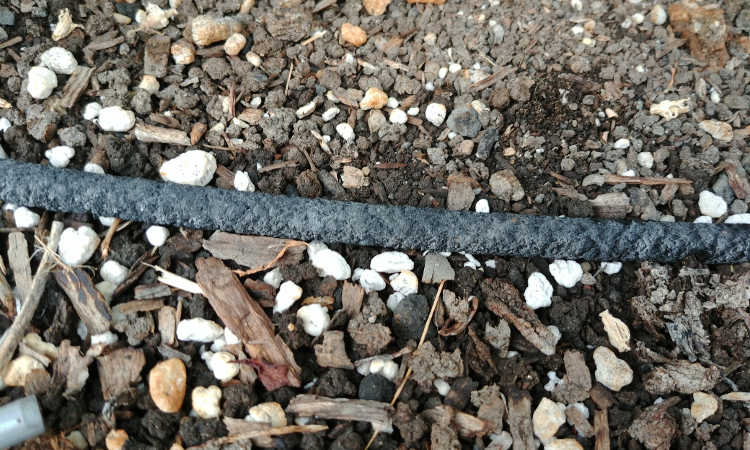
As it would imply from its name, soaker hoses are hoses that will soak your plants. Generally made of porous rubber material, these hoses are designed to allow water to ooze into your garden over a period of time. This ensures deep watering instead of shallow surface watering.
Often made of recycled rubber from used tires, the material used is thoroughly sterilized and repurposed into something sustainable. In getting your soaker hoses, you’re often supporting that recycling effort and being earth-friendly!
Unlike other forms of irrigation, a soaker hose seldom will get water directly onto the plant, as it doesn’t spray. This is really beneficial for most people.
There’s nothing wrong with using a sprinkler, mind you, and many people do! But if you have a plant that’s susceptible to diseases like powdery mildew or other fungal diseases that spread rapidly in wet environments, it’s much safer to opt for a soaker hose over other forms of irrigation.
There’s a lot of other benefits, so let’s look at some of the other great aspects of soaker hoses now.
Benefits Of Using A Soaker Hose
As soaker hoses don’t spray, they enable the user to reduce water usage. There’s no waste involved, as the water goes straight from the hose into your garden. Further, the slow oozing of the hose prevents runoff and erosion in the garden.
I mentioned a moment ago that soaker hoses tend to keep the water off the plant foliage, and that comes with a distinct benefit. Less moisture on the plant means less susceptibility to fungal disease. But they also help control the soil moisture, which can prevent soil-borne disease too!
Use of soaker hoses can reduce the spread of weeds. As water is concentrated along the hose, weeds that are out of range of the moisture pattern will suffer from a lack of water. This can keep weeds at least partially at bay!
There are time savings involved as well. Since you don’t have to fill watering cans or hold a hose sprayer, you can set it and forget it, and your garden will effectively water itself. Even if you don’t have a timer, simply turning on the faucet and coming back later is super-easy.
Finally, did I mention that it’s super easy? Because that exact watering pattern is very easy to maintain. Once you’ve gotten your frequency planned out, watering is simplicity itself. It takes a little getting used to, but you can do other things while your garden is being watered!
Soaker Hose Vs. Drip Irrigation
So by now, you’re probably wondering what the difference between a drip hose and a soaker hose is. Let’s go over those.
The term “drip hose” is used for multiple forms of irrigation, all of which begin with a flexible but solid hose. Generally made from plastic, it can simply be punctured along its length at intervals (causing it to drip), or can be fitted with specific attachments that direct a drip or spray.
Drip hoses provide a fixed spacing for watering. For instance, if you are growing grapes, you can set up a drip hose to directly hit the root zone for each grapevine, with long spaces of unbroken hose in between the vines.
By contrast, a soaker hose releases water along its entire length, so it provides an even strip of water release. This can be very effective in a home setting, and is much more useful if you’ve got a large number of plants in a small location!
Soaker Hose Installation
Let’s discuss everything you’ll want to know before you install your soaker hose system. It’s important to know the various components needed to connect it all together!
Soaker Hose Components
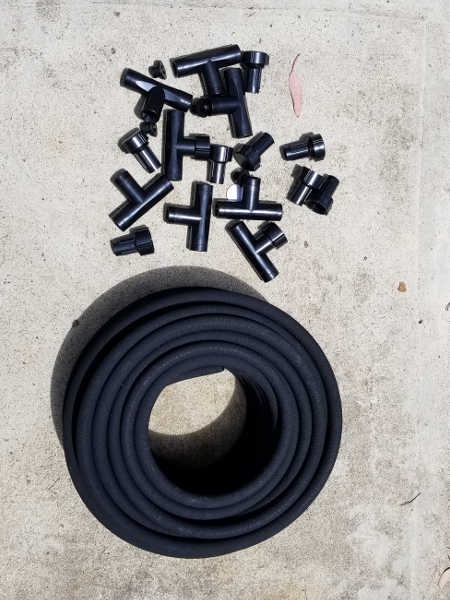
Other than the soaker hose itself, there are a few other pieces you’ll need to get everything connected up.
First off, you’ll need to decide how the water is traveling from the faucet to the soaker hose. You can simply use a garden hose extended over to the bed that needs to be connected. Alternately, building an in-ground network of PVC plumbing pipes to help direct the water is good.
Assuming that you’ve already figured out how the water will be making it to the beds, you’ll need a tubing adaptor (often included in kits). This is something that screws onto the end of the hose or pipe and causes the flow to narrow down to a size that will fit into the soaker hose.
You will also need a series of couplers. Depending on your orientation, you may need tee couplers, corners, or straight pipes.
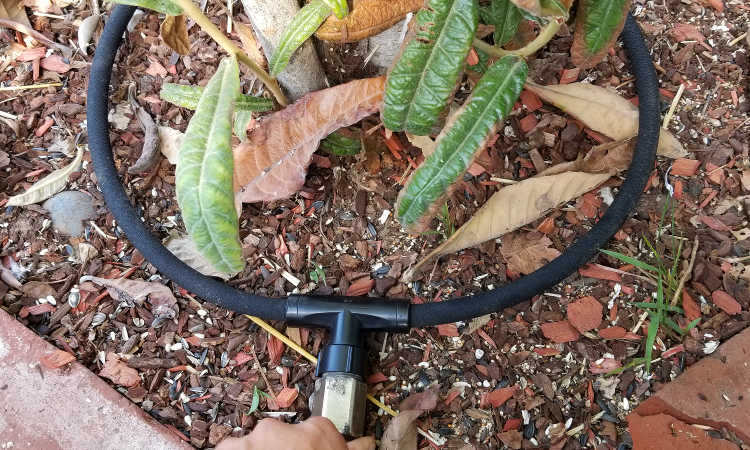
With a tee fitting, you can make a loop that can be used around a tree or particular plant. It can also be used to create lines that run across a wide bed. Corners are obvious as they direct the water flow around a corner. Straight pipes join two hoses together.
A soaker hose end cap for the open end of the hose will be necessary. Those who set up ring-shaped soaker hoses won’t use end caps, but if you have a lot of straight hose extensions, you’ll need them.
DIYers also may want a non-porous hose to transport water in their beds to the desired soaker starting location. Be sure to select one which matches the diameter of your soaker hose so that the couplers match!
Faucet End Components
At the faucet end, there are a number of options that may be needed depending on your setup.
It is always good to make sure you have a soaker hose pressure regulator in place. What a pressure regulator does is ensure that the water is slowed down before reaching the soaker hose, which prevents tears or bursting hoses.
While many residential water systems already regulate the pressure somewhat, soaker hose water pressure levels vary. Some are only rated for 10 PSI, where others can handle a much heavier water flow. If you have a low-pressure soaker hose, definitely use a pressure regulator.
Another option at the faucet end is a water filter. This can be extremely useful if you have hard water that may have mineral deposits in it, as it can keep those deposits from getting into your soaker hose system.
If you plan on installing multiple soaker hoses, a hose splitter added after the pressure regulator is in place can help with splitting up your watering pattern into different locations. The splitter enables you to have multiple hoses running from a single faucet.
Finally, there’s always the option of adding a timer on the faucet side, although we’ll go into those a bit more down below.
Layout & Planning
Determining how to install soaker hose systems in your yard really has a few key factors you need to take into consideration.
First, what do you need to water? Are you planning on using soaker hoses in raised beds, or are you looking for flower bed irrigation? Soaker hoses for trees, or a soaker hose for vegetable garden watering purposes? You’ll need to identify where these will need to be placed.
Knowing how long to run soaker hose distance-wise is important, too. Generally, a soaker hose shouldn’t be much over 25 feet in length for best functionality. While you can get one to work up to 50 feet in length, the second half really sees a reduction in water flow from the first half.
Tree soaker hoses can be formed into a loose loop around the base of the tree. If it’s a more mature tree, going out 2-3 feet from the trunk is a good diameter. Young trees can have it much closer to the trunk, 6-12 inches. Avoid putting it directly against the trunk.
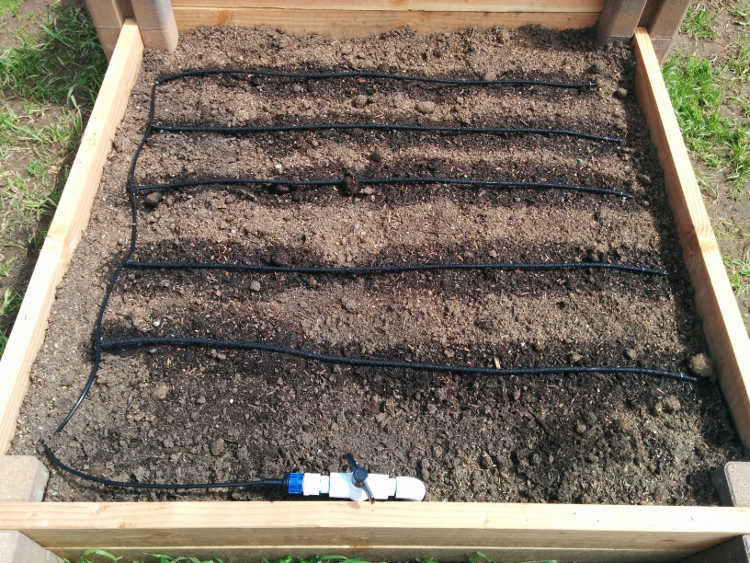
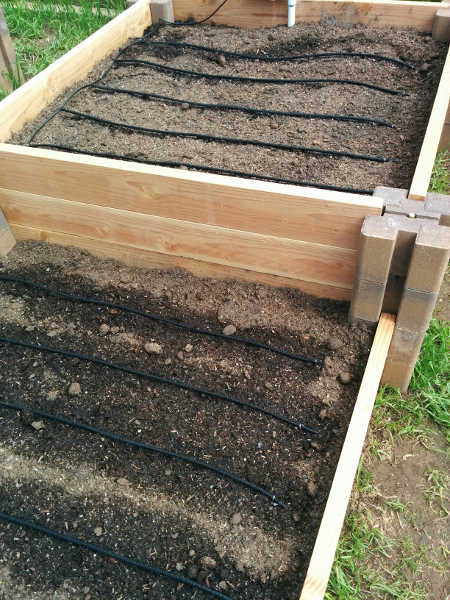
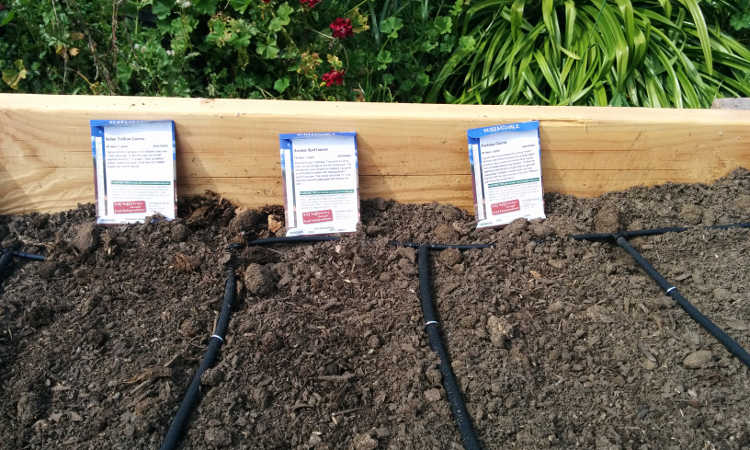
A soaker hose vegetable garden layout can be done in a loop form if you’ve only got a few plants to encircle. If you have a lot of plants in rows, you may want something a bit more elaborate.
I use both forms as needed. Loops I use for just a few plants, those which are in large containers, or trees or bushy plants. For neatly ordered rows in my vegetable garden, I make an extended E shape that has multiple soaker arms coming off of a non-soaker hose at one side.
Buying The Parts And Installing
And now the fun part: how to install a soaker hose.
You’ve planned your layout. Now you should know which plants you need to water, and you have an indication of how to get the water to those beds or locations.
Kit Or DIY?
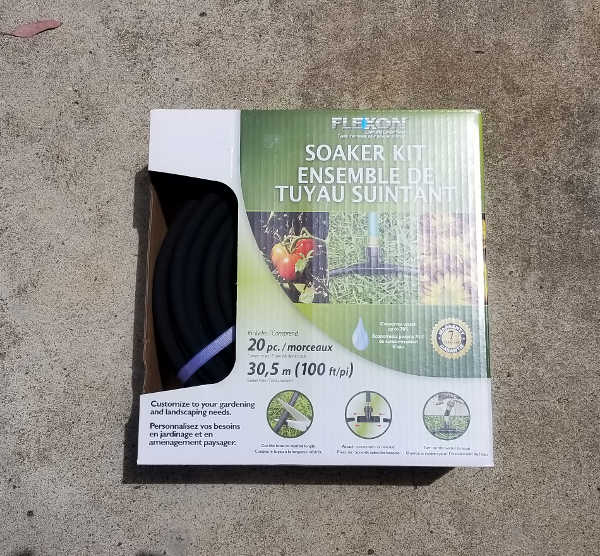
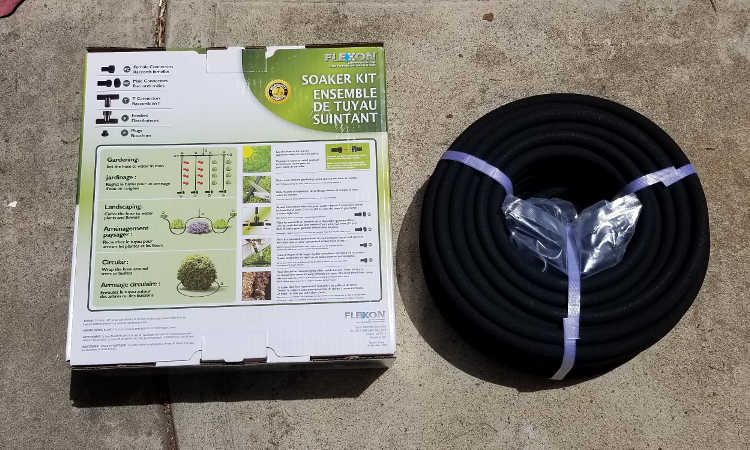
First, decide if you want to buy a kit, such as this great Flexon Soaker Kit, or whether you’d rather build your own. I’m particularly fond of the Flexon kit because it’s extremely easy to assemble and has the basic parts already included.
Flexon’s kit has a wider diameter hose at 3/8ths of an inch, which enables you to supply an ample amount of water in a short period of time. It’s made to hook directly to a normal garden hose, simplifying your installation even more.
You will get 100 feet of hose and 20 connectors in your kit (including two that hook directly to garden hoses), and it’s incredibly plug-and-play in how it works. All of the instructions for installation are included. And buying Flexon’s kit saves money and avoids the storage of extra parts.
Their soaker hoses also handle residential water pressure beautifully without needing a regulator, so unless you have high pressure you can skip that step! And they can be laid out as either a ring kit around a plant or in other configurations depending on your needs.
If you want to DIY your own kit, it’s a bit more complex. Take measurements to determine exactly how much soaker hose you’ll want to pick up, and plan out how many connectors and what types you’ll need. You may find you’ll need quite a few supplies and that a kit would be simpler!
I’ve made a helpful list of the components I used while building an extended E system last year, and you can go skim through them at the top of this post. Be sure to add a pressure regulator that matches your setup (I included the one which fits my PVC pipes) if working with 1/4″ hose.
One thing to keep in mind when DIYing your soaker hose system is that you should stick with parts from the same manufacturer. That doesn’t mean that you absolutely can’t mix and match, but you’ll have better luck if using all the same company’s parts.
As a general rule, beginners to soaker hose irrigation will really appreciate the all-inclusive nature of Flexon’s soaker kit. More experienced gardeners may like the ability to DIY their own oddball configuration that exactly fits their needs. It all comes down to what you need to water!
Installation
Whether you’re using the Flexon Soaker Kit or DIYing your own system, assembly of your soaker hose system is fairly simple once designed.
Cut your soaker hose to the lengths it will need to be for your layout. If you’re not looping, cap one end of the hose with a hole plug. Attach the other end to the appropriate connector (or both ends to the tee connector if it’s looped). When assembled, attach it to your water source.
You will need a pair of heavy-duty shears (I found sharp wire cutters worked well too), and occasionally a pair of pliers to help you snug the components together. DIYers may require a few extra tools depending on their setup, so be sure you know everything you need.
How To Use A Soaker Hose
So now that you have this fantastic system, how do you use it all? Let’s talk about that!
How Often Should You Water?
The quick answer to this is that it depends on your system and its layout.
For most gardens, people will want to water about 1″ per week. Your soaker hose flow rate should be listed on the roll of hose or kit packaging that you purchase. Typically, narrower soaker hoses have a faster flow rate.
How much water does a soaker hose use per hour? That’s also a difficult question, although a common one. Again, it depends on the soaker hose. If you’re using a narrow soaker hose, it will use less water overall. A larger diameter hose takes more water to fill and ends up using more.
You can do a water test by taking an empty can or small plastic tub and burying it in the soil under your soaker hose. Turn on the hose, and time how long it takes to fill the bottom of the container 1″ deep. That’s how long your soaker hose should be run over an average week.
In the summertime, you’ll need to water more often as hot weather will cause evaporation. You might need as much as 2″ per week. If you mulch overtop your soaker hose, you’ll have less moisture loss than you would without the mulch, and that will help you save more water.
Do You Need A Timer?
Soaker hose timer settings vary from manufacturer to manufacturer, and realistically, a high-quality hose timer from any company may be of benefit to you. If you’re planning on going on a vacation for a week, you don’t want your garden to lack water while you’re away!
I personally only opt to use a timer when I’m going to be away. I’ve turned watering into a game now. If I turn on the watering system, I know I then have 30 minutes to pull as many weeds as I can, or to do other gardening tasks. But my system requires one short burst of time.
Splitting up your watering by multiple different valves is an option, especially with more advanced hose timers. You can have your water to one bed run for 30 minutes and shut off, and then water the next bed for the next 30 minutes (note: that time is an estimate based on my setup!)
If you want your soaker hose system to run while you’re at work, then absolutely, buy a timer. Similarly, if you’re not a morning person but would like your watering done early in the day, a timer becomes a necessity. It’s certainly worth the money spent.
Non-Plant Uses
Did you know that soaker hoses have uses beyond simply watering your plants?
In many areas of the country, clay-like soil can pull away from the side of the house. This leaves a gap behind which can cause a house’s foundation to shift or crack. Using a soaker hose for foundation stability can be done.
Place soaker hoses foundation deep in the ground (at the base of the slab) in cracks that form next to the house. Turn them on for short periods of time to cause the soil to swell back against the foundation, preventing damage to your home.
Be sure that if you are using a soaker hose to protect your foundation, it is thoroughly buried in the soil. Usually, it’ll need to be a few inches deep. But by regulating the moisture under your house to ensure it remains consistent, you will reduce the risk of damage to your foundation.
Soaker Hose Tips
Is your soaker hose not watering evenly? The most common problem when this happens is that you’re losing pressure toward the end of an overly long hose. If you want a longer hose, opt for a narrower diameter that takes less water to fill (such as 1/4″ instead of 1/2″).
Even then, it’s important to avoid using a soaker hose that’s longer than 50 feet, and I avoid using one that’s longer than 25 feet of straight soaker hose. I will instead opt for multiple extensions off of a solid hose, and no more than 25′ of soaker hose per connection.
Are you finding your beds are too dry? You may be having too much evaporation, a common issue if your soaker hoses are exposed. To avoid that, put mulch over the top of your soaker hoses. 2″ of mulch will help prevent excess evaporation.
Did one of your hoses stop working? It may be clogged, which often happens in areas with hard water. Use filters to avoid calcified deposits from washing into your hoses. You can flush the hoses in the spring and fall to ensure they don’t get clogged.
Once your soaker hose is severely clogged, it can be difficult to clear out calcified deposits from its porous surface. At that point, you can replace segments of the soaker hose as needed. It’s best to prevent those initially and to be proactive in maintaining your hose.
Full Disclosure: Flexon provided their hose kit to Epic Gardening to use and evaluate for review purposes. See the review process here.
Publicaciones relacionadas:
 Cómo cosechar menta y almacenarla para más tarde
 Cosecha de papas: cómo saber cuándo están listas sus papas
 9 variedades de col rizada que querrás cultivar
 Macetas de turba: macetas biodegradables para tu jardín
 Curar batatas adecuadamente para su almacenamiento
 Echeveria Elegans: cultivo de bolas de nieve mexicanas
 Los muchos beneficios del fertilizante líquido Kelp
 Rhaphidophora Tetrasperma: maravilla tropical de hoja partida