
The birds-nest fern is a must-have plant if you’re slowly turning your home into a haven for tropical plants. This lush, leathery-leaved fern finds its home in humid environments naturally. Still, bird’s nest ferns can easily become a brilliant flush of green emerging from a central rosette indoors or out. Does this sound enticing? If so, read on to learn all about the bird’s fern and how to care for it!
Subscribe to the Epic Gardening Podcast on
Bird’s Nest Fern Overview
 Quick care for the bird’s nest fern, illustrated by Seb Westcott.
| Common Name(s) | Birds nest fern, Bird’s nest fern, Bird’s-nest fern, ō-tani-watari, tani-watari, Crow’s nest fern, Nest fern, Bird’s nest spleenwort, Wild birdsnest fern, New World birdsnest fern |
| Scientific Name | Asplenium antiquum, Asplenium australasicum, Asplenium nidus, Asplenium serratum |
| Family | Aspleniaceae |
| Height and Spread | 2-3 feet tall and wide |
| Light | Shade to indirect low light |
| Water | Moist but not wet soil, water around base of plant |
| Soil | Extremely well-draining potting mix |
| Fertilizer | Balanced liquid fertilizer, diluted to half or less strength |
| Pests and Diseases | Foliar nematodes, caterpillars, fungus gnats, mealybugs, scale, slugs. Also can experience bacterial blight. |
Types of Bird’s Nest Fern
Asplenium antiquum, ‘Bird’s-Nest Fern’, ‘ō-tani-watari’, ‘Tani-watari’
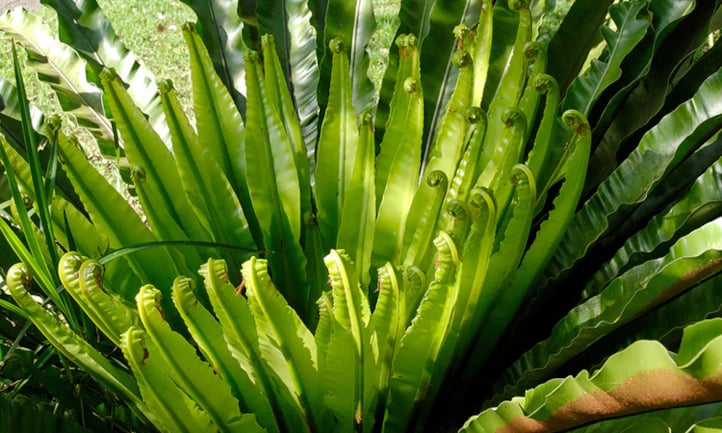
Native to the temperate regions of eastern Asia, these bird’s nest ferns grow on tree trunks, cliffs, and in dark forests. While it is endangered in the wild, it’s commonly available throughout the United States and Europe as an ornamental houseplant. It grows on average 2-3 feet in height/width. Bright green blade-like leaves with a firm center rib and uniform width extend upward from the tight root mass. The edges of the leaves are delightfully crinkled and rippled.
Asplenium australasicum, ‘Bird’s Nest Fern,’ ‘Crow’s Nest’
 Asplenium australasicum. Source: Tony Rodd
Originates from the New South Wales and Queensland regions of Australia. Asplenium australasicum looks as though it would be as much at home on a desert island as it would be in your living room. A distinct central rib juts out from beneath its wide yellowish-green leaves. The rib appears almost like a boat’s keel. As the leaves grow, these bird’s nest ferns uncoil themselves to reach towards the sun. This epiphytic plant isn’t just pretty, though. It might just be part of dinner in Taiwan, as its leathery young greens are used as a vegetable.
Asplenium nidus, ‘Bird’s-nest Fern,’ ‘Nest Fern’
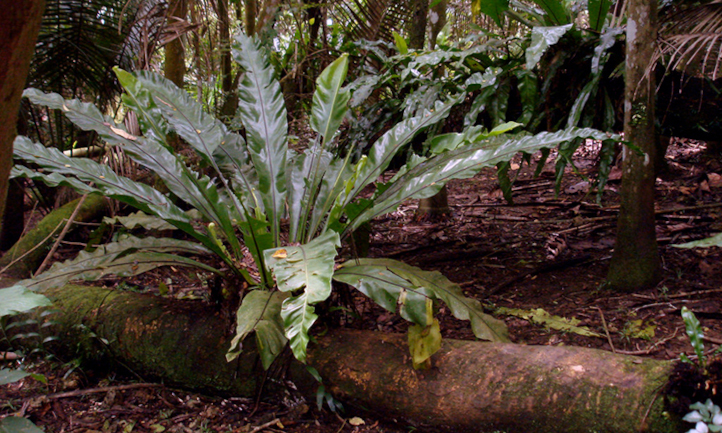
In the wild, the Asplenium nidus bird’s nest ferns grow in eastern tropical Africa, northern Australia, and tropical Asia. While Asplenium nidus can be either epiphytic or terrestrial, it’s fond of rich organic matter. Asplenium nidus often can be found living in bromeliads or on palm trees in its natural environment. Asplenium nidus is also wildly popular as a houseplant, with light to medium green leaves reminiscent of banana leaves. Asplenium nidus is a popular fern.
Asplenium serratum, ‘Bird’s Nest Spleenwort’, ‘Wild Birdsnest Fern’, ‘New World Birdsnest Fern’
Native to the Caribbean, Brazil, and Florida in the United States. The wild birdsnest fern is considered to be endangered in Florida and is rare to see in the wild now. It can live as either a lithophyte or epiphyte and is happy on both eroded limestone and rotting wood. It also makes a beautiful houseplant, albeit one which may be a bit harder to find initially. Its leaves are typically quite crinkled along the edges and tend toward medium to dark green in color.
Bird’s Nest Fern Care
The birds nest plant doesn’t have to be hard to take care of. In fact, it makes a fantastic houseplant because it’s so easy to care for! But it has some specific requirements you need to meet for optimal growth.
Light
The bird’s nest fern prefers to have indirect sunlight or shade conditions. It can do surprisingly well as an indoor plant with only occasional exposure to natural indirect lighting or even under artificial light. Outdoors, it prefers shade as opposed to direct sunlight, as its waxy leaves will scorch easily.
It’s also easy to tell if it’s receiving too much direct sunlight, as the leaves will begin to become pale rather than vibrant midrange green. In addition, the leaves will become more crinkled with the extra direct sunlight.
Water
This is a tropical plant, and so bird’s nest ferns adore the humidity. However, bird’s nest ferns don’t like wet feet. If bird’s nest ferns are grown terrestrially in a potting blend, it has to be extremely well-draining. Regular mistings of this fern will help to keep the humidity levels around it up. Its pot can also be placed on top of a tray holding rocks and a small amount of water to increase the ambient humidity.
However, unlike some other fern varieties, the bird’s nest fern forgives occasionally dry conditions. It won’t immediately wilt if you are forgetful and miss watering it for a day or two. It won’t necessarily thrive in drier situations, but it also won’t die off rapidly.
When watering, water around the outside edges of the plant rather than from overhead. If it is watered from the top, too much water can collect in the plant’s central part and create a blight risk. Water correctly for a healthy plant.
Soil
As the bird’s nest fern is typically epiphytic (grows on wood) or lithophytic (grows on rock), it can exist without standard soil blends at all. You can find a particularly nice chunk of an old rotting log or a board to hang on the wall and use it for dramatic effect. Sphagnum moss is also appropriate as it promotes correct soil moisture.
However, it can also be grown in very well-drained potting soil. A blend designed for orchids or bromeliads works perfectly, or you can use a blend heavy in humus or peat moss and lots of perlite, or you can make your own peat-based potting mix. The fern soil should be moist but not wet at all times.
Many gardeners who are attempting to grow bird’s nest fern outdoors with other plants in a shady environment find that it just isn’t humid enough around their plant. In situations like that, it’s good to pile a thick layer of mulch around the base of the plant to help keep up the humidity at its center.
Fertilizer
With bird’s nest fern, too much fertilizer is more dangerous than not enough. An overabundance of fertilizer, especially in heavy peat-based potting mix, will cause the leaves to take on a brownish or yellowish cast along the edges. It may also deform the leaf shape. But it does need some food nonetheless. Fertilize during the spring or summer months only, and only a few times. Two to three times during the year will suffice. Use a balanced liquid fertilizer that’s diluted to half strength or weaker, and apply it to the soil or base of the plant rather than the leaves.
Propagation
Unlike most ferns, bird’s nest fern is quite difficult for the average home gardener to propagate. It commonly propagates from spores in the wild. In commercial settings, it’s most commonly propagated by tissue culture. Because of that, it’s best to purchase your fern from a home and garden center than to try to propagate your own.
If you still would like to try reproducing your own bird’s nest fern, you can try to harvest spores. The spores look like little lines of brownish, fuzzy spots along the underside of some of the leaves. When these spores are fat and look quite fuzzy, trim off the leaf the bird’s nest ferns’ spores are on. Carefully place it into a paper bag. Over the next few days, the spores should collect in the bottom of the bag.
Once you have your spores, prepare a pot of sphagnum peat moss. Scatter the spores across the top surface, leaving them uncovered. Place your pot of moss and spores in a dish of water and allow the water to seep upwards through the moss from the bottom. Keep the spores moist by covering the pot with a plastic bag or plastic wrap, or hand-mist the top daily. Keep the pot at temperatures between 70-80 degrees in a shaded location.
The spores should start to germinate in 2-3 weeks, and if the pot is covered with plastic wrap or a bag, you should be able to remove it sometime between 4-6 weeks after starting the spores.
Repotting
Since the bird’s nest fern is naturally epiphytic, its root mass doesn’t grow large enough for it to require repotting in fresh potting mix to prevent root constriction. However, it can become unstable as it becomes larger and will need a larger base to attach itself to. Generally, it’s best to repot every 2-3 years or when it appears to become unbalanced on its current platform. If you have to repot fern plants, use appropriate potting soil and a pot that provides side stability for the long fronds.
If you have your fern attached to a log or board, keep a watchful eye on it. Be ready to replace the wood with something larger when it seems to be needed. Take extreme caution when loosening its grip on its support wood, very gently prying the root mass away from its old wood. If necessary, you can trim some roots, which may encourage new root growth. Then train your plant to its new wood by helping it grasp onto the wood, spreading out the root mass. It may require temporary support while it learns how to hold on to its new home.
Pruning
The bird’s nest fern often doesn’t need much in the way of pruning, as it tends to maintain its own shape and size. However, if you wish to trim it back, you can remove leaves from the outside of the plant down at the plant’s base. This is usually sufficient. You can also trim leaves that are less visually appealing as necessary.
Problems
Most problems with growing bird’s nest fern come from pests, but there are a few other issues. Here’s a list of the most common difficulties and how to fix them.
Growing Problems
The two worst growing problems for most fern growers are overfertilization and watering it incorrectly.
Overfertilization is something to avoid particularly. This can cause yellowing or browning of the leaves, spotting, or leaf deformation. Be sure to avoid giving your bird’s-nest fern too much fertilizer!
If watered from the top, blight can be a major issue. It’s better to water your plant around its base, being sure that water does not pool there and that the soil drains easily. In ideal conditions, the soil will be moist but not soggy at all times.
If your fern’s leaves are extremely flat, it may not be receiving enough light, and might appreciate a little extra indirect sun occasionally. Be careful not to expose it to direct sunlight. If its leaves are too crinkled, it’s getting too much light and needs more shade. Adjust the lighting conditions, so the fern is to your preference.
Diseases
The most common disease for birds nest fern is bacterial blight. In this condition, water-soaked, translucent small spots begin to form on the leaves. These rapidly enlarge, turning reddish-purple around the edges, and can spread up along the leaf veins. If you begin to see signs of this sort of damage, quickly trim off the damaged leaves at their base in an attempt to prevent further spread.
Most bactericides are ineffective if it spreads even after you’ve trimmed the damaged leaves. You can certainly try them anyhow to attempt to combat the bacteria. However, if trimming off the damage doesn’t work, your plant may need to be destroyed to prevent further bacterial spread. Do not use that soil for plants unless it has been thoroughly sterilized.
Pests
Foliar nematodes can be a major issue for bird’s nest ferns in contact with soil, and it looks an awful lot like bacterial blight initially. Small, water-soaked translucent spots will form on the leaves. However, instead of turning reddish-purple as they would with blight, these go brown to black. Often, plants that are showing signs of nematode damage need to be destroyed, and the soil will need to be sterilized to eliminate the nematodes. Before throwing out the plant, you may want to try applying beneficial nematodes and see if they will help eradicate the pest nematodes. They can also help sterilize the soil.
Caterpillars such as cutworms can be a problem, causing munching along the outside of fronds. If you discover caterpillar damage, apply Bacillus thuringiensis (BT) in either spray or powder form to all leaf surfaces, top and bottom.
Another pest that can become an issue is the fungus gnat. The larvae eat the lower parts of the plants and the root, and the adults become a flying nuisance while leaving superfine webbing on the plant surfaces. You can combat these using beneficial nematodes to find and consume the larvae and use neem oil on the foliage to deter the adults from landing around the fern to lay their eggs.
Mealybugs can create cottony masses on leaves and roots. These pests will cause your plant’s growth to become stunted. You can deal with these rapidly by using insecticidal soap to kill the mealybugs off.
Scale insects will make your plants appear stunted. These insects feed on the stems and leaves of your bird’s nest ferns, and can sometimes look like spores, and other times be difficult to see at all. Use insecticidal soap products to combat these pests, too.
Slugs are yet another problem pest for bird’s nest ferns. These cause feeding damage on the leaves which is pretty obvious, and a quick inspection on the underside of the leaves will reveal them. You can hand-pick them off and dispose of them. Use a slug and snail bait around the base of your plants to kill others who might go after your bird’s nest ferns.
Frequently Asked Questions
 Bird’s nest fern, aka Asplenium nidus. Source: Lauren Gutierrez
Q: My bird’s nest fern is sticky. Help?
A: If it’s sticky, that’s likely something called honeydew resulting from a scale infestation. Scale insects may be hard to spot, but that stickiness is a sure sign that they’re present. Use insecticidal soaps or pyrethrin sprays to combat these pests, such as the suggestions I gave in the pest segment.
Q: How can I attach my bird’s nest fern to an upright rock or board?
A: This process can be fairly complicated, especially if you’re trying to convince it to grow on a surface you plan to hang or set upright. However, silicone-based glues have been used to attach bromeliads to boards. You will need to carefully trim away part of the plant to create a flat surface in the root mass.
Then, use just enough glue to help anchor the center of the root mass to the board or rock, so it doesn’t slide. Too much glue will prevent the roots from taking in nutrients from the surface you want the plant to live on. Carefully drape the rest of the roots around the board/rock and leave it leaning against the wall for a few days, misting it regularly to allow the roots to take hold. Do not hang your board or rock until the plant has fully grabbed on and become secure.
Q: How do you care for a bird’s nest fern?
A: This entire piece covers that topic. Check it out!
Q: Is bird nest fern hard to care for?
A: Bird’s nest ferns aren’t hard to care for! Give them the right conditions, and you will give your bird’s nest ferns easy living.
Q: Where should I place a birds nest fern?
A: Keep your bird’s nest ferns in areas with bright, indirect light as opposed to direct sunlight. Also, keep them out of conditions with too much heat. Spray them with filtered or distilled water daily or provide a humidifier.
Q: Is bird’s nest fern indoor or outdoor?
A: Bird’s nest ferns do best in temperate, humid, shady conditions — not direct sunlight. If you have a spot year-round outdoors that meets these requirements, you can grow one outdoors. However, most people in North America must grow them indoors.
Q: Should I cut off brown leaves birds nest fern?
A: Bird’s nest ferns appreciate pruning of browned leaves as they emerge.
Q: What does an overwatered birds nest fern look like?
A: The leaves of overwatered bird’s nest ferns brown and droop.
Publicaciones relacionadas:
 Zona por Zona: Qué Plantar en Agosto
 Cómo usar arena verde en el jardín
 Cómo secar orégano y almacenarlo correctamente
 Las 14 mejores plantas de sombra para interiores para habitaciones con poca luz
 Jardinería para ancianos: envejecer con gracia
 Cuidado del agave ovatifolia: cultivo del agave lengua de ballena
 Candytuft: plantas fronterizas perennes de fácil crecimiento
 Growing Star Apple: A Fruit You’ve Never Heard Of