
If there’s any herb that has a long and storied history, it’s the white sage plant, also called salvia apiana.
Used heavily amongst California tribal people for centuries (and still in use today), this plant has many names given by the tribes who use it.
The Tongva or Gabrielino tribe traditionally called it kasiile and found it on hills around the area now known as Los Angeles. A similar pronounciation, qas’ily, was used by the Chumash people who lived along the current Santa Barbara coastline. The inland Luiseno tribe referred to this plant as qaashil. To Kumeyaay peoples who were in the area around modern-day San Diego, it was known as shlhtaay.
Now, of course, all of these people in their many and varied locations throughout the state usually just call it white sage, or sometimes California white sage.
Viewed as a sacred plant, it also has been traditionally used for food, medicine, and many other purposes.
While an individual salvia apiana plant can survive for many years in the wild if the surroundings are right, most people find it a bit more complex to grow in the garden. Yet it can be a beautiful and worthwhile plant to have on hand.
So please, read on for an in-depth gardener’s guide to this ancient herb. While we’re at it, we’ll discuss the best way to grow this plant both for use ornamentally and for collecting smudging herbs!
Listen to this post on the Epic Gardening Podcast
Subscribe to the Epic Gardening Podcast on iTunes
White Sage Overview
| Common Name(s) | White sage, California white sage, sacred white sage, grandfather sage, bee sage, buffalo sage, and a number of traditional tribal names |
| Scientific Name | Salvia apiana |
| Family | Lamiaceae |
| Origin | Southern California and parts of northern Mexico |
| Height | Up to 6’ tall, can spread almost as wide but typically 3-4’ wide |
| Light | Full sun, no shade |
| Water | Extremely drought-tolerant. Established plants need minimal to no water. |
| Temperature | Warm weather conditions preferred. Does not like temperatures below freezing, does poorly below 25 degrees Fahrenheit. |
| Humidity | Can tolerate humidity but may have disease issues |
| Soil | Sandy, extremely well-draining soil |
| Fertilizer | No fertilizer required. Likes low-nutrient conditions. |
| Propagation | By seed or cutting |
| Pests | Aphids, whiteflies, flat mites, spider mites. Also susceptible to powdery mildew, rust, and root rot. |
What Is White Sage?
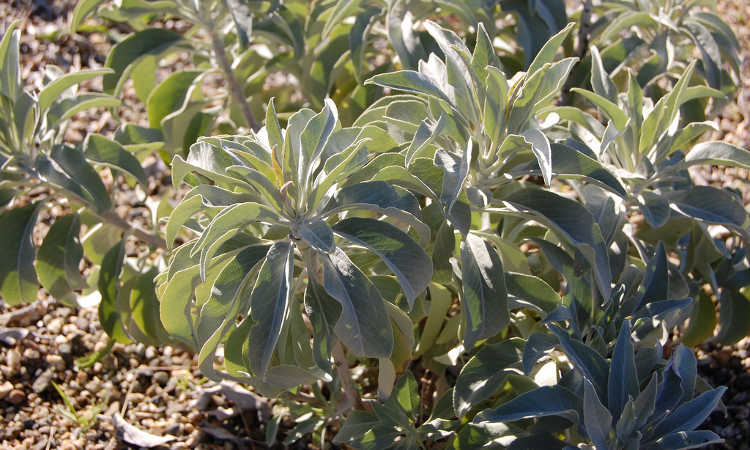
Salvia apiana, often referred to as California White Sage, is a large perennial desert plant. It grows in spiky clusters in sandier soils, often in foothill areas of southern California and down into Mexico. Its name comes from the leaves, which have a grey-green tinge to them when fresh and which turn a greyish white when dried.
In the wild, white sage can often grow to heights of six feet tall and many feet in diameter. Its long stems come from a central root mass and last throughout one growing season before drying and dying back. As a desert plant, it likes hot, dry conditions.
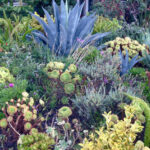
It’s become a popular choice for people who are opting for lower-water gardens, and can be easily incorporated amongst other low-water plants for good effect. If you’re trying to conserve water, this might be the perfect plant for you!
A Short History of Tribal Sage Use
Before we can discuss the uses of white sage amongst tribes, it’s important to realize that it is not even close to the only type of sage that was used traditionally by tribal peoples. In fact, the use of white sage was only truly common traditionally amongst the tribes in the desert southwest, since it did not grow elsewhere.
A Diversity Of Sages
Amongst Californian peoples, white sage is occasionally referred to as grandfather sage, as it grows to be so much larger in its elder form than any of the other sages in California. And there are, in fact, other indigenous sages! Salvia melifera (black sage) and salvia officianalis (garden sage or culinary sage) are common throughout California and into Mexico, as well.
While in modern times, black sage is spreading northward and taking over the habitats where white sage once grew, it is not used in precisely the same way. Black sage has a more acrid and chapparal-like scent, and was traditionally used in very specific ceremonies, where white sage is used for most day-to-day use.
However, the two look similar, although black sage tends to be shorter and more grey than white when dried. The leaves of black sage are also a bit smaller and narrower than white sage.
There are also other plants referred to as sage which aren’t sages at all. The two most common of these are Artemisia cana (silver sagebrush, also referred to as Badlands sage or South Dakota sage) and Artemisia tridentata (big sagebrush, desert sage, mountain sage, and many other names).
Artemisia cana is occasionally called Sundance sage because it is widely used by the Lakota and other tribes as part of the Sundance ceremony. This plant grows in the northern plains area of the United States, and is hard to find outside of that region. Its leaves are narrower than California white sage and have a distinctly different aroma.
By comparison, Artemisia tridentata is incredibly widespread, both in tribal use and in growing area. This little-leafed plant is used very similarly to salvia apiana ceremonially, but its scent can be described more as a dusty sage scent. It can be found across the western half of the United States in the wild.
There is one other Artemisia species that should be noted here: the white sagebrush, Artemisia ludoviciana. It grows in similar environments to Salvia apiana, and it looks quite similar to Salvia apiana as well. However, it can grow in partial shade instead of full shade. This plant’s aroma is more like the dusty sage scent of Artemisia tridentata. It’s used medicinally by tribal people.
Smudging or Smoke Cleansing
White sage was traditionally used for ceremonial or medicinal purposes. The most well-known of these uses is burning it to release its fragrant smoke. While the term “smudging” is often applied to this process, the origin of that term actually comes from medieval Europe. A more accurate term would be smoke cleansing.
The smoke produced has traditionally been used to purify or cleanse objects by fanning it across the object. It is also used similarly to purify or cleanse people in a similar fashion. Tribal spiritual leaders might have special fans or feathers which they would use for this purpose, depending on the specific tribe’s religious views.
While it is easiest and most common to bundle the leaves and stems together and dry them for this purpose, they can also be burned individually. Crumbled or powdered leaves can be burned as powdered incense too.
The smoke is used in many other traditional ceremonies. Ohlone people use it as part of the preparation for and during their bear dance, for example. The Cahuilla bird singers often use it before they sing the traditional songs. It is an integral part of many Californian tribal religions. Uses like these tend to be overshadowed in the public eye by the popularity of smudging with white sage for its cleansing purpose.
Food and Medicine
Traditionally, white sage leaves were chewed by Californian tribes to freshen the breath and to stave off thirst on hot days before other modern methods were available. This might have been due to the high eucalyptol content in the leaves, which leaves a refreshing, almost minty coolness in the mouth after chewing.
That same eucalyptol content made it extremely helpful during times of sickness for clearing congestion. A common practice was to boil sage leaves for five to ten minutes in a small amount of water, then to breathe the steam from the container. This would help relieve congestion and ease cold symptoms.
Sage leaves and stems were boiled in water to produce a strong-scented liquid that would be used as a sort of shampoo and body wash. This not only eliminated body odors, but provided a slight antibacterial effect which helped with keeping the skin free from bacterial problems.
The leaves were used as a spice in cooking, but also offered medicinal value both as a poultice or a tincture as well. Roots were also used medicinally, and were believed to help strengthen women recovering from childbirth.
The seeds were gathered and powdered along with maize and other seeds and spices to form pinole, a flour-like substance that was an ingredient in many staple foods for tribal people.
The stems of white sage were seldom used medicinally, but were occasionally used in cooking for flavor. Young stems were sometimes utilized for making small items such as baskets while fresh and somewhat pliable.
Many of these traditional practices are still in use to this day, although most tribal members make use of the advances of modern medicine and contemporary products as well as their traditional methods.
White Sage Care
Growing white sage can be tricky for many gardeners because it goes against what we’re all accustomed to. In the wild, salvia apiana is a desert plant, accustomed to long spans of time between watering and extremely hot conditions — both things that we tend to forget about when we’re planting it!
But it’s not impossible to grow white sage, and it’s actually really worth maintaining this perennial plant in your yard. Here’s a list of some of the best ways to grow and maintain your plant for years to come.
Light
For white sage, sun is life.
Salvia apiana absolutely demands full sun. It really does not perform well in shaded conditions at all. Pick the hottest and sunniest part of your yard to plant your white sage in, because it will thank you for it.
White sage does not like cold weather conditions. If your winter drops below 20 degrees consistently, you may have difficulties growing it there. It’s best in those conditions to transplant your sage and take it indoors to warmer temperatures for the winter, providing it plenty of light from a grow light.
Water
Once white sage is established, it does extremely well in very dry conditions. It puts down deep taproots to search for its own water supply.
For the first year after you’ve started a new sage plant or transplanted a young plant in, water it once per week. You do not need more than 1/2″ to 1″ of water per week. Gradually reduce the watering over time as the plant’s root system becomes established.
Once a white sage plant has been in place for a year or two, it’s likely going to find all of the water it needs on its own. You can choose to water it sparingly during periods of drought or in extremely hot weather, but once established, it shouldn’t need much water if any at all.
Soil
Sandy soils that are extremely well-draining are preferred by white sage. Think of the natural soil makeup of a foothill in the southern California region – dusty, sandy soil with lots of decomposing granite. That’s the ideal “flavor” of soil for your white sage plant. If this doesn’t describe the soil in your region, opt for a cactus growing soil blend.
If you have richer soils, it can tolerate those, but be sure they’re extremely well-draining as sage really hates soggy soil.
Fertilizer
White sage doesn’t need fertilizing. In fact, it actually prefers low-nutrient soils as an adult plant.
If you want to give young plants a gentle kick-start, side-dress around your plants with a light coat of spent mushroom compost. This provides a tiny amount of extra nitrogen to help spur plant growth, but won’t overwhelm your plants.
Spacing
This plant can grow to reach heights of 6′ tall, and can easily spread out over 3-4′ or even wider. Because of this, I advise not planting your plants closer than two feet, and if you’re really trying to cram them in, no closer than 18″. They need room for both the roots to expand and for the plant to grow!
Propagation
White sage can be propagated in two ways: from seed, or by cuttings. Read on to find out how to do these two forms of propagation!
Growing White Sage From Seed
Seed is the most common way to grow new plants. However, white sage seeds are notoriously bad at germinating. It’s not uncommon to have a germination rate of 20-30%. Because of this, you will need to plant far more seeds than you expect to eventually plant out.
When planting your seeds in the spring, it’s easiest to start white sage in seed starting trays or pots rather than direct-seeding it.
Sprinkle your seeds across the surface of the soil, and then mist them with a water bottle. Keep your seeds in a location that is in the 70-85 degree range. Provide full light from a grow light if growing them indoors, or place them in direct sun.
You will want to keep the soil lightly moistened initially for your young plants, and then wait until the soil begins to dry out before moistening it again. Once your plants have started to grow, water no more than once a week, but only if the soil feels dry.
Growing White Sage From Cuttings
If you have an established white sage plant that’s at least a couple years old, you can opt to take a young cutting and try to coax it to take root. This also has a low success rate of around 20%. However, if finding seeds is difficult in your area, getting a cutting from someone with an established plant may be easier.
Make a special mix of 1/3 perlite, 1/3 medium-grained sand, and 1/3 seed starting compost. Lightly moisten the mix and place it into pots. Then, take 4-6″ cuttings from the top of an established sage plant. Be sure to select cuttings with newly-forming leaves at the top, and cut just above a leaf node.
Dip your cut end into water, then into a rooting powder such as Bontone Rooting Powder. Gently tap the cutting against the side of the container to knock off any excess, then place it into your prepared pot. Try to have your lowest set of leaf nodes about 1/2″ beneath the soil’s surface, and press the soil in to hold the stem in place.
Until your cutting takes root, it’s best to keep it in a partly-shaded location on top of a heat mat that’s set between 70-85 degrees. The warmth will help promote root growth. Only water when the soil feels dry just below the surface near the cutting, and water sparingly just to dampen the soil blend.
After 4-6 weeks, gently tug on the cutting to see if there’s any resistance. If there is, it has formed roots. Remove rooted plants from the heating mat, as the warmth is no longer required. Keep your plants in partial shade for a few more weeks, then carefully transplant them into a pot of well-draining, sandy garden soil or cactus blend.
At this point, it’s time to get your plants accustomed to sunlight. Slowly increasing over 2-3 weeks’ time, give your white sage plants more sun exposure until they’re out at all times. Once they’re hardened off, maintain them until fall and transplant them then.
Transplanting and Repotting
Transplanting a white sage plant is best done in the fall, as the fall through early spring months are the months when white sage growth tends to happen. The plant goes dormant during the drier summer months of the year, so transplanting it in the fall gives it the best chance to establish hardy roots before the heat comes.
Your sage plant should have at least 2-4 sets of true leaves, but I actually prefer to start seeds in the spring for plants I plan to transplant in the fall, as it gives them more time to develop.
To transplant, simply prepare your bed with a sandy, well-draining growing medium or cactus potting blend. Place your white sage plant in the ground at the same depth that it was in the pot. Be sure to gently open up the base of the roots if they’ve gotten rootbound, so that they can stretch back out in the soil.
Lightly water your new transplant in, and give it a little extra water initially, but no more than 1/2″ to 1″ a week. Don’t water if rain comes, as it will get plenty from the rain.
If you’re simply replanting white sage in a larger pot, the process is essentially the same as transplanting. Try not to put multiple plants any closer together than about 18″ so that they have plenty of room to grow. Remember, white sage can get to be a huge plant when it’s in the ground, but it’s restricted a bit when it’s in a pot. You’ll almost never achieve maximum size in a pot.
Traditional Growing Methods
Tribal people would harvest the seeds of the white sage by cutting off the dried seed pods and putting them into a pottery container, then tightly closing or covering the top. They would then shake the pot to cause the seeds to break free of their pods. Once this was done, they could pour the seed and pod mixture onto a piece of cloth or leather, remove larger bits of pod, and lightly blow the chaff away.
Any seeds which were to be replanted would be taken out to a place where people had been harvesting sage. After offering thanks to the plants for their bounty, a small handful of seeds would be cupped between the sower’s hands and rubbed together. This lightly abraded the surface of the seeds to allow them to take on water during the next rain.
The seeds would then be broadcast across the area and left to sprout. While it’s likely that seeds would be carried off by wildlife, enough seeds would sprout to keep the plants growing in the area.
Companion Planting
Most gardeners just grow white sage on its own, but it companion plants well with the following plants:
- California Buckwheat
- Black Sage (just be careful it doesn’t take over!)
- Hollyleaf Cherry
- Sugar Bush
- Lemonade Berry
- California Sagebrush (keep them separate so you don’t confuse them)
Harvesting and Storing White Sage
There’s a few tricks to keep this plant around, both in storage and in the world around us. Read on to learn when and how you should harvest your sage, how to dry and store it properly, and how to make sure we don’t lose it forever.
When To Harvest White Sage
Plants would not be harvested until they were at least a couple years old. This ensured that the plant would be able to handle the trimmings without adverse reactions.
Traditionally, harvests would take place at different times of year depending on what the plant was to be used for.
If the plant was meant for cleansing smoke purposes, it would be harvested after a period of drier conditions. This allowed the plant to use up much of its water stored in its leaves, making the oils in the leaves more potent. Ideally, the leaves would still be pliable and there would be young growth, but they would have a strong, pungent scent when rubbed.
For medicinal or food purposes, white sage could be harvested at any time of year, but its flavor or medicinal properties would vary. Again, this is related to how much water the plant might have stored in its leaves. Drier conditions made more pungent food herbs or resulted in stronger medicines, where wetter conditions tended to mellow these out and might require larger amounts to be harvested.
How To Harvest White Sage
It is important to cut white sage cleanly with a pair of bypass pruners or snips. Try to avoid crushing the stems, as that can lead to disease.
Never take more than a third of any plant at a given time, as that can cause the plant to go into shock. Only cut from the younger, fresher plant tips, leaving the older and woodier stems intact. Cut just above a leaf node, as that will cause the branch below to send out new branch growth from the nodes and bush out more.
Be sure that when you are harvesting your sage, you select a day when it has not been raining, and that you harvest at mid-day or in the early afternoon when all morning dew has already evaporated. This ensures that your leaves will be dry at the time of harvest, reducing the likelihood of mildew forming on them later.
To harvest white sage seeds, wait until the plants have flowered and the flowers are beginning to dry. Take paper bags and put them carefully over the flower stalk, using a rubber band to secure them in place. Then allow them to continue to dry. Occasionally shake the bag to see if you hear rattling inside. Once you do, the petals are falling off, and you can cut the stalk just below the bag and remove it. Shake the bag to free the seeds from their pods.
Storing
Once you have harvested your sage, it is essential to dry it quickly. There are two ways to do this: either loose, or in bundles.
Loose sage leaves can be dried simply by laying them out on a mesh screen in an area with low humidity and low light. You should be able to easily crumble a leaf between your fingertips when it is dry. Store loose leaf sage in an airtight storage container. You can add a moisture-absorbing dessicant packet if you would like to keep it dry.
To create sage bundles, be sure that your harvested sage leaves are completely dry to the touch. Take multiple stems of sage and group them together, tying a piece of cotton string around the stem ends to gather them together. Then, grasp the stem end with one hand, and carefully gather the leaves up against the stems with the leaf ends pointing towards the top of the bundle.
Wrap your string around the bundle multiple times from base to tip to secure the leaves in place, finishing by tying off the string at the stem end. Leave plenty of extra string to create a loop, and hang your sage bundles in a dry, dark location to completely dry out. It’s helpful if you can have a fan lightly blowing on them to reduce the moisture in the bundles more quickly.
Place your dried sage bundles in a box for storage. Cardboard is actually really good for this purpose, as it can absorb any residual moisture the bundles might have.
One note: please do not use heat to speed your sage drying process, as this will give it an unusual and unpleasant aroma. Dehydrators, ovens, all of those methods are not good for this plant. Air drying is best.
A Note About Wild Harvesting White Sage
Since white sage has become extremely popular for smudging purposes, there’s been an ever-increasing number of people picking it in the wild. This is not always people gathering it for personal use. Often, it’s being collected for resale purposes, and there is no effort at reseeding the plants or encouraging their continued growth.
As a result, salvia apiana is rapidly becoming an endangered species in its natural environment. Because of this, I do not recommend wild-harvesting white sage if you can avoid doing so. Since it naturally flourishes in areas where it’s also extremely popular, this has depleted stands of white sage to the point where it’s becoming difficult to find in unprotected areas.
If you do find yourself needing to harvest wild white sage, take some time to spread sage seeds around where you’ve harvested from, and perhaps take a pump-sprayer full of water and lightly mist the area to encourage germination. Try to encourage new sage plant growth where you harvested so that the plant will continue to thrive there long after you’re gone.
But I really recommend opting to take a few cuttings or seed pods and growing it yourself. Once your plant is established, you will have a never-ending source of sage at your disposal!
This video offers some thoughts from the currently living tribal peoples of California as to why wild gathering may be both a blessing and a curse. It’s a fascinating bit of insight into the current Native culture and how they’re trying to sustain these plants.
Problems
While I’ve gone over the most common problems already in the above sections, there are still a few other things to be aware of. Let’s go over those now.
Growing Problems
Since white sage is indigenous to southern California, it’s more difficult to grow it in regions where the weather gets colder. Anywhere there are regular temperatures below freezing, you may find your plant suffering.
Younger white sage plants should be carefully dug up and transferred into a pot during those cold weather months. Be sure to keep it in a warm location with a grow light to provide it with all the light it needs.
Older, established sage plants, especially large ones, are much more difficult to move. Once your sage plant is over 3 years old, chances are you’re not going to want to try to transplant it anymore so you don’t risk transplant stress. At this point, it’s a good idea to mound sand up in a thick pile over the base of the stems of the plant. While you may suffer some stem damage, keeping the base warm should allow the plant to regrow later.
Pests
Aphids will thrive on sage plants. After all, the white sage stores its extra water in its fleshy, leathery leaves, and that makes it a delicacy for the aphids! You can use neem oil to repel these pests and keep them at bay. However, if you’re planning to harvest for burning purposes, avoid using neem oil for seven to ten days before harvest.
Whiteflies are another pest that can wreak havoc on your white sage. These also like to suck the plant sap from the sage leaves, but thankfully, the same neem oil you’re using to prevent aphids will also prevent these pests, both inside a greenhouse or outside.
The red and black flat mite (Brevipalpus phoenecis) is another sap-sucking pest that could infect your sage, as is the omnivorous flat mite (Brevipalpus californicus). Both of these are considered “false spider mites”, and they can cause browning or reddening of leaves, patchy spotting of leaves, and other issues. Thankfully, neem oil is also effective against these, too!
And, of course, there’s always the spider mite itself. While these are less common on white sage than they are on other less-pungent sages, they still can take up residence, especially during the drier months of the year. One more time: use the neem oil!
Really, neem oil is a great preventative for nearly any pest problem that salvia apiana may develop. If you have worsening conditions from any of these pests, you can opt to use an insecticidal soap with neem oil blended into it and coat all surfaces of the plant. This should eliminate your pests for good, and regular applications of neem oil will keep them at bay.
Diseases
The most prevalent disease of white sage is powdery mildew. Since sage likes hot conditions, any humidity that accompanies that heat can spawn an outbreak, as can moisture that remains on the leaves. Thankfully, the same neem oil that will defend your plant against pests is a good preventative for powdery mildew as well.
Rust is another disease that can impact your sage. The Puccinia and Uromyces species are particularly risky. These start out as yellowish or whitish spots on the top of your leaves, but the underside of leaves may develop orangish rust in the same locations. Remove any affected material as soon as you notice it, and avoid watering the leaves of the plant. Ensure it has plenty of airflow to allow leaves to dry out.
Root rot is another problem that white sage is susceptible to. This is usually caused by one of a number of fungal agents that’s active in overly wet soil. To prevent root rot issues, simply don’t overwater. Your sage will thank you in multiple ways!
Frequently Asked Questions
Q: Why are my white sage leaves turning red?
A: White sage leaves and stems turn red, purple, or mauve as a result of drought stress. This actually is not a problem for the plant, as it will continue to survive even if the lower leaves and stems are starting to redden. It can actually be quite beautiful!
If you start to see reddening leaves, you can give the plant a little assistance with a light drizzle of water at the base of the sage. That should perk it right back up.
Q: How much sage can I get off one plant?
A: This is a tricky question to answer because it depends on the size of your plant and how long you’ve been trimming it to encourage more branching out. Older, heavily-branched sage plants may produce quite a lot of sage, but younger plants may only produce a couple of bundles’ worth.
Plants under a year shouldn’t be trimmed, and in fact, in the second year, you should be careful not to take too much.
Q: Where can I get white sage seeds?
A: There are a number of places online to order white sage seeds, and you may actually be able to find white sage plants at local garden centers if you’re in California. While no white sage seeds are going to have a phenomenal germination rate, I’ve found the salvia apiana seeds from West Coast Seeds to be relatively reliable, as are the seeds from Peaceful Valley Farm Supply. Both of those businesses are based in California and have access to wild growing plants.
Publicaciones relacionadas:
 Cómo quitar el óxido de las herramientas de la manera más fácil
 Planta de musgo irlandés: cubierta de suelo perenne y afelpada
 Growing Cilantro Indoors: A Primer
 Hoya Plant: How To Grow And Care For The Wax Plant
 Cómo cultivar verduras para ensalada
 Cómo cultivar microvegetales de trébol rápido y fácil
 How To Spread Mulch The Right Way
 Xeriscape Plants: 35 Drought-Resistant Options