
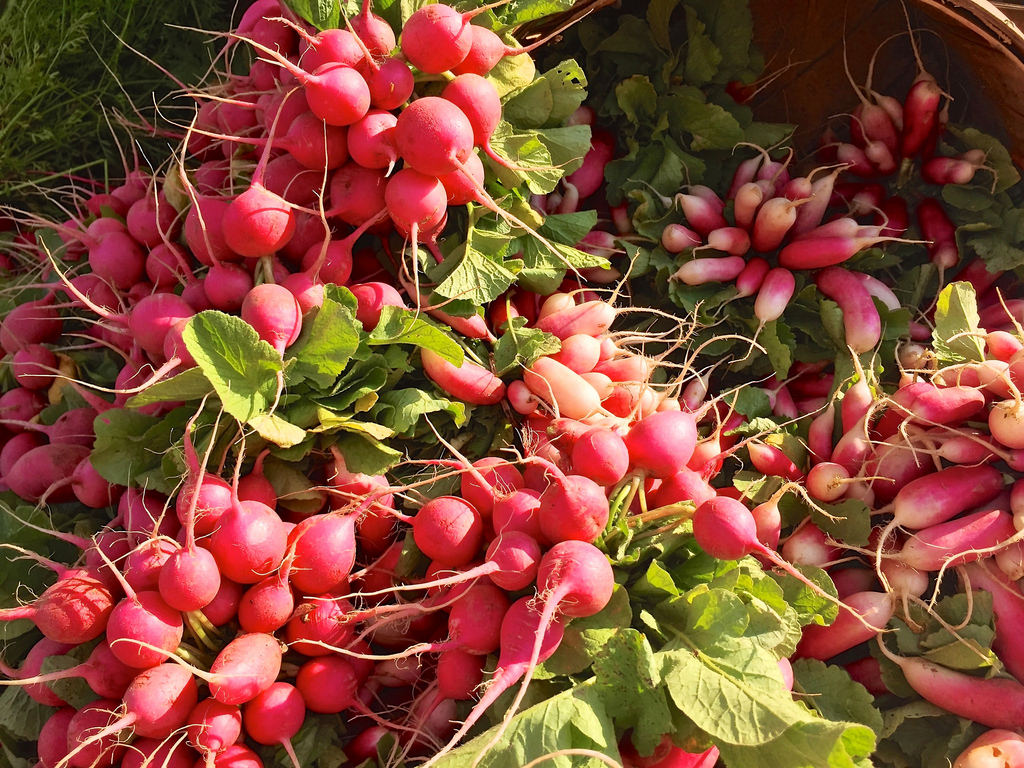
Ever wanted to know how to grow radishes? Radishes are one of the most popular root vegetables in most salads, veggie trays, and stir-fries – and for a good reason. They’re extremely nutritious and easy to grow in the vegetable garden. Some of the fastest-growing radish varieties mature in as little as three weeks.
Because they’re quick growers, they make a good crop to plant to mark areas where you’ve planted slower-germinating vegetables like carrots or parsnips. Don’t plant them near other members of the cabbage family, though.
Today, we’ll talk all about Raphanus raphanistrum subsp. sativus, the radish plant. Everything you ever wanted or needed to know about these delicious roots is right here!
Radishes: Quick Care Guide
| Common Name | Radish, daikon, and an extremely wide variety of individual cultivar names |
| Scientific Name | Raphanus raphanistrum subsp. sativus |
| Days to Harvest | 25-100 days, depending on cultivar |
| Light | Full sun |
| Water | Even watering, about 1” per week |
| Soil | Well-draining, prefers sandy loam, 65-70 pH |
| Fertilizer | None. No, really, none is needed. |
| Pests | Aphids, cabbage loopers, flea beetles, some nematodes, root maggots |
| Diseases | Downy mildew, bacterial (septoria) leaf spot, white rust, club root |
Recommended Radish Varieties
There are plenty of varieties of radish out there. The most difficult decision is what color of radish you’d like to grow. Size is also a factor, especially if you consider growing daikon varieties – they are huge! Most radishes bolt and grow pods in warm weather. Then they develop seeds within the pod that look like tiny beans.
Here’s a list of some of the most popular varieties today.
Standard Radishes
These are what most Americans think of when they consider radishes. Typically either round or oval in shape, these are the small radishes used for salads and snacking.
- Cherry Belle: 25 days. Cherry belles are round and red with a crisp white core. Tolerant of poor soil, cherry belle radish grows in dry, hot weather.
- Burpee White: 25 days. Pure white radish, best eaten at 1″ across. Quick and easy to grow in cool weather.
- Pink Beauty: 26 days. Uniform, round roots. Crisp texture and taste. Pastel pink coloration.
- German Giant: 29 days. Large, 1.5″ across round radishes. Crimson skin, mild flavor with white flesh. Grows quickly!
- Bacchus: 30 days. A round and vibrantly purple radish. It can get quite spicy in hot weather.
- French Breakfast: 30 days. Purplish-red at the top, gradually lightening to white at the root end. Best grown early spring through late summer. A great mild flavor that goes well with cheese toast.
- Organic Rudolf: 25 days. Uniform cherry-sized red radishes. The Rudolf radish variety is productive, vigorous, and proven to do well in organic culture.
- Helios: 32 days. Bright yellow radish with great flavor. Quick grower, and looks good in salads.
- White Icicle: 32 days. Snowy white, this heirloom radish can grow to be 5-6″ in length and about 1″ in diameter.
- Black Spanish: 55 days. Snow-white interior, jet-black skin. Extremely old heirloom variety.
Daikon-Type Radishes
These Asian radishes grow to extremely large sizes. There have been reports of daikon radishes that reached a yard long! Commonly used to make kimchi, made into a pickled slaw of daikon and carrot, or cooked with traditional Asian foods, this somewhat sweet radish with a mild flavor is popular. They are eaten raw as well.
- Mini Mak: 50 days. Miniature daikon that grows to 4″ long x 1.5″ wide. A good alternative when a full-sized daikon is too big.
- Miyashige: 50 days. Fall crop daikon variety. Green and white in coloration, with an exceptionally mild flavor. It can reach 18″ long and 3″ wide.
- Green Luobo: 60 days. Sweet, crispy green flesh. Grows up to 10″ long but can be harvested at 6″ lengths.
- Daikon Long: 60 days. Averages about 14″ in length. White with a green neck. Good standard variety.
- Minowase: 60 days. Popular Japanese hybrid radish. Can reach 16″ long and weigh close to 2 lbs.
Unusual Radishes
Wild colors and extreme size – these are some of the crazier and more unique radish varieties available.
- Dragon: 40 days. Fiery red skin, white interior. Best harvested at 4-5″ long. Great slicers with a peppery flavor.
- Bravo: 49 days. Pale purple to white with purple streaks, 5-6″ long by 2.5-3″ wide. Sweet flavor.
- Rat-Tail: 50 days. This radish is grown for its edible seed pods, not its root! Seed pods grow to 6″ in length and look somewhat like pea pods.
- Watermelon: 50-60 days. With peppery roots growing 2-4″ in length, this white-skinned radish has a vivid purple-pink interior.
- Sakurajima Giant: 100 days. Grown in Japan as the “largest radish in the world,” it commonly reaches 15 pounds weight in that country. One specimen was nearly 100 pounds!
- Schifferstadt Long Black: Not stated, estimated 70 days. 1700’s era Pennsylvania Dutch variety. It can reach 16″ in length and weigh several pounds. Black skin, white flesh.
Planting Radishes
Of all the vegetable types, radishes are some of the easiest to grow. In fact, they’re a great first crop for children because of how quickly some varieties are ready to eat! It’s about as close to instant gratification as a plant can achieve. Here’s how to get started.
Like many other plants, there are different radishes that flourish in many a growing season. However, most radishes fall into two varieties: early spring and summer, or fall and winter radishes.
Early spring radishes and summer radishes are planted as soon as the ground is workable in the spring and sometimes grown well into the summer. Most heat-resistant varieties of radish fall into this category. Early varieties are less heat-tolerant, but you can get a reasonable crop from those before switching to a more heat-tolerant type.
Fall and winter radishes include many larger radish varieties as well as some of the sweeter radish types. During this growing season, they take a while to mature but tend to be quite cold-tolerant. While a hard freeze will be a problem, an occasional light spring or fall frost doesn’t bother most radish plants.
To have a continuous harvest throughout the growing season, plant radish seeds in early spring and sow more seed weekly to keep radish plants in all stages of development. When you are near the hottest part of the year, stop sowing until cool weather, and then plant radish seeds of fall and winter radish varieties. If you have hard freeze conditions, protect your plants with a cold frame.
You can plant radishes almost anywhere. However, as with any root crop, ensure adequate soil preparation is enacted to enable easy root growth.
For fast-growing radishes that are small, loosen the soil surface at least six inches deep. For larger radishes like daikons, or winter radishes, loosen the soil to two feet.
You can grow early spring radishes and summer radish varieties indoors under grow lights easily in the dead of winter, as long as the ambient temperature is around 40 degrees or higher and the soil is warm. Container-growing radishes is just fine for these varieties. When you’re looking for a good container for indoor winter radishes, try the professional-grade Root Pouch grow bags or Air Pots we stock in our store.
Larger-rooted varieties need more space to grow. Grow these directly in the soil or in a raised bed environment. A 24″ tall raised bed is perfect for most varieties of daikon, for instance.
These crops make great companion plants for squash varieties or cucumbers, as they deter cucumber beetles. Similarly, if you’re growing spinach, they distract leafminers from your spinach plants. Plant them with beans (both bush and pole varieties), melons, lettuce, beets, tomatoes, carrots, or peas. They enjoy the company of nasturtium plants too.
Do not plant radishes with potatoes or hyssop plants, as they do not get along and may suffer poor growth near them.
Once you have prepared the soil for your radish variety, plant your radish seeds. Generally, radishes like to be planted one-half-inch deep and about an inch apart. After you have planted your seeds, pat the soil firm and gently water.
Once your seeds germinate, thin radishes to 2 inches apart (or 3-6″ apart for larger varieties, depending on the type). Begin sowing new seeds weekly to maintain a steady harvest of radishes.
Lay down a layer of mulch around your plants to prevent weeds. Water regularly for the best growth and flavor.
How To Care For Radishes
Radishes are easy to maintain, but let’s go over the basics for your radish crops!
Light and Temperature
Radishes need full sun. Too much shade and they’ll put all of their energy into producing radish leaves instead of the roots. Be sure your radishes get at least eight hours of sun.
Root crops like radishes experience their best growth at 55-65 degrees Fahrenheit in humid conditions. Depending on the variety, they can handle colder or warmer conditions as well. If the weather is between 40-70 degrees, you should be just fine for most radishes.
Winter varieties easily handle weather down into the 40s, as long as the soil temperature remains consistently warmer than the air temperature. Some can handle light spring or fall frost, but not repeatedly.
If the temperature is higher than 90 degrees, most radish seeds will not germinate. Radish plants struggle in 80-degree conditions and may bolt to seed at that point.
Watering
Consistent, even soil moisture is essential for radishes. They prefer well-drained soil and don’t like muddy conditions, but they do want lots of moisture regularly. Be sure your soil remains moist yet not soggy.
The peak demand for water is while your plants are developing and building large roots. Once they’ve started to develop that root, keep the soil evenly moist, and they’ll handle the rest.
Soil
A well-draining, light sandy loam with a neutral soil pH between 6.5 and 7.0 is perfect for your radishes. However, most radishes will take a wide variety of soil types, just as long as its well-drained soil and doesn’t turn into mud. Whatever you do, avoid fresh manure. Fresh manure and overly rich soil, in general, has the right soil moisture but can encourage lush foliage rather than robust roots due to their nitrogen levels. It also may contain harmful micro-organisms that could harm you if you eat radishes raw.
Fertilizing Your Radishes
Radishes are cruciferous vegetables that don’t need much fertilizer. To be honest, it’s far too easy to overfertilize your radishes.
If you wish to use fertilizer at all, use a low-nitrogen option. Often gardeners offer as much nitrogen as they can to their plants, but nitrogen will encourage lush foliage instead of root development. We want the radish roots to be plump and tasty, as opposed to woody inedible roots! Something higher in potassium and phosphorous encourages root growth rather than green growth.
Propagation
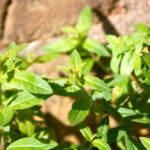
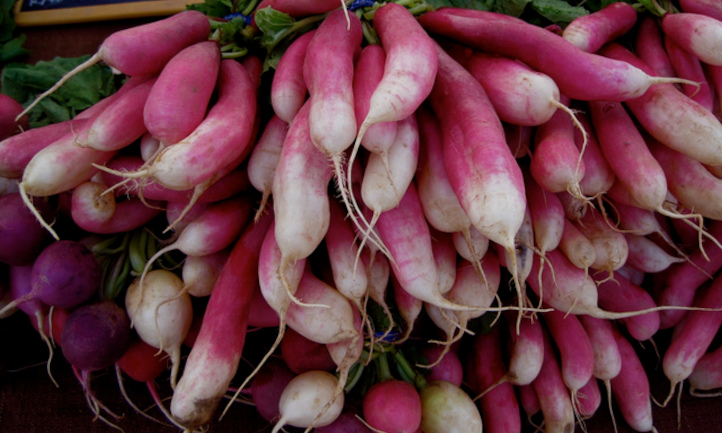 French Breakfast radishes. Source: bhamsandwich
Radishes can only be propagated by seed. As they are a fast-growing root crop from germination to full development, harvest most of your radishes for the roots and leave a few to develop seed pods.
To harvest radish seed, allow the pods to dry on the radish plant. Once they start to turn brown, pull the entire plant up and knock off dirt clinging to the roots. Place it in a paper bag upside-down. Allow the pods to finish drying out completely. When they have totally dried, the pods will pop open, and the seeds, which look like tiny beans, will drop into the bag, somewhat like pea pods.
Pruning For Radish Greens
Most radishes have developed spiky hair-like protrusions on their foliage to protect the radish plant. However, if you have a “hairless” variety of radish leaf, you can harvest and eat the radish greens. White Icicle is a good example of a hairless variety.
There are some varieties of garden radish that are grown more for their greens than for the root! These are referred to as “radish leaf” types, and are found with other Asian seed varieties.
To harvest radish greens, pick them when they are young and tender, and the roots are just forming. Snip a couple of leaves off of a given plant at ground level and allow the rest to remain to keep the root alive. Alternately, harvest the whole plant to eat all of the greens and the young, small root.
In recent years, the use of radishes as a cover crop has become more popular, especially in areas that get hard freezes. Planting long varieties like daikon in the fall gives the extended roots plenty of time to bore deep into the soil. When freezing weather occurs, the radishes die off. However, their roots retain nitrogen and release it slowly as they decompose. By early spring, the soil is not only loosened for planting, but it is nutrient-dense.
Use crop rotation if you’re using this method so as not to develop radish pests in a given area. This method is proving useful to many large-scale farmers. Whether this method works or not in a home garden is less known, but it should work just as readily on a small scale. In addition, the radish roots decompose quickly, adding organic matter to the soil fast.
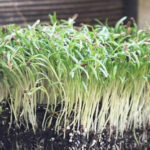
You can grow radishes as sprouts or microgreens for salads and sandwiches! Daikon, China Rose, White Icicle, and some other radishes make excellent sprouts. Make a sprout jar out of a large mason jar. Place a tablespoon or two of radish seeds into the jar and soak them overnight, then thoroughly drain all of the water. Use the ring from the jar with a piece of fine mesh or cloth over it to keep the seeds inside while you drain. Then, remove the top and place it in a dark place.
Rinse the seeds with fresh water every 8-12 hours, draining them off completely each time. Keep them in a dark location like a cupboard. Within 2-5 days, you should have a crop of radish sprouts ready to eat.
Remove them from the jar, place them into a large bowl, and fill it with water. Swish them around to remove hulls, which should float away from the sprouts easily. Then drain them completely once more and store them in the refrigerator. Your sprouts should keep for up to a week, but you’ll probably eat them before that time is up!
I recommend watching this video, which will teach you the process of how to get a batch of radish (or other) microgreens started!
Harvesting and Storing Radishes
Harvesting radishes that are large can be a little tricky. Most people don’t think about storing radishes for long — they’re so good when they’re fresh! But with a few tips, you can harvest radishes and store your produce like a pro.
Harvesting
Radishes are best harvested sooner rather than later. Harvested too late, they may crack or lose their flavor.
For smaller radishes, keep a book with estimated harvest dates based on the time of growth. About a week before maturity, pick a good-looking radish and pull it out to check the size. If it’s full-sized, begin your harvest then. If it still has a bit of time left, wait for another week to pass, and then check another radish.
The process is similar for larger radishes but wait until the actual estimated date to begin checking. Harvest them at any point up until the first frost date in the fall. (Or, extend the harvest period with a cold frame.)
Daikon radishes or other large varieties can be difficult to harvest, as the greens may break off in your hand. Use a digging fork to gently loosen the soil around your large radishes, and then grasp the greens and top of the radish to pull it from the soil. Don’t bend the longer radishes as you pull them out. This may break them in half. Pull them straight up from the soil for best results.
If you are harvesting edible-pod radishes, watch for the blossoms to appear, then begin checking your plants every 2-3 days. Edible pods look similar to green beans and will be ripe and ready to pick when they’re about the thickness of a pencil. The lowest pods ripen first.
Harvest the pods by grasping the small stem at the end of the pod and bend it sideways. It should snap off from where the stem attaches to the branch.
Storing
If you are going to use your radishes within a few days’ time, consider water storage. Place your radishes in a shallow bowl with 1-2″ of water, greens still attached, and place it in the refrigerator. The greens and roots will last for 5-7 days easily this way.
Jar-store your smaller radishes. Remove the greens entirely, wash the radishes off thoroughly, then place them in a jar and cover them with cool water. The water helps the root stay hydrated and preserves them for longer. You can store the jar in the refrigerator for up to a couple weeks.
Alternately, remove the greens, then place the unwashed radishes in a ziplock bag with a moistened paper towel in the bottom to keep their humidity up. Place them in a dark crisper drawer in the fridge. They last up to a month this way as long as they have enough moisture. Check them at least once a week for mold or rot, and dispose of any that are doubtful.
Winter radish varieties can be stored in a cold root cellar or basement at between 34-42 degrees Fahrenheit, with a humidity of 90-95%. Prepare a box with layers of moist sand separating the unwashed roots. Ensure none of the roots are directly touching one another to avoid the spread of any rot.
Check your radishes every week to make sure none are developing mold or rot. If any have developed rots or mold, remove them and get rid of them. Well-stored winter radishes last for up to three months in this environment.
Winter radish varieties can also be stored directly in the soil they grew in! A thick layer of straw or hay, about 4-5 inches deep, will insulate your plants. Alternatively, use a cold frame to keep your plants warm.
Edible radish pods do not store as well as root radishes. Use them quickly after harvesting. You can store them in a ziplock bag in the refrigerator for up to one week.
Radish greens do not store well at all. It is best to use them the day of harvesting them so that they’re fresh.
You can pickle most types of radish to extend their preservation. There are many recipes out there for a radish-pickling brine, but usually, it’s a mix of vinegar, salt, sugar, and herbs. Occasionally some wine is added for flavor. Depending on the brine used, these store for anywhere from a month up to six months in the refrigerator, although most varieties are best used within 1-3 months after pickling.
Radishes can be dehydrated or freeze-dried. Either method works to produce crispy little radish chips. However, like other cruciferous, slower-growing vegetables, freeze-dried or dehydrated radishes can emit a gas that can compromise a vacuum seal. Store these in a glass mason jar with some desiccant packets, in a dark cupboard or other dark storage space.
Use those dehydrated or freeze-dried radishes to make a radish powder that can be added to soups, stews, or other dishes for an added burst of radish flavor. Or use them to make a radish sauce that has a milder horseradish flavor.
Radishes do not normally freeze well, so I do not advise freezing most varieties. The one exception is daikon. To freeze daikon radishes, scrub them off thoroughly in water to remove dirt. Cut them into small pieces or grate them. Blanch the radishes in boiling water for 2-3 minutes, then put them into an ice bath to stop the cooking process. Drain well, then place them in a plastic bag and freeze them.
Freezing will change the daikon texture slightly, but the blanching process will stop them from becoming rubbery as smaller radishes might.
Troubleshooting
While radishes are easy to grow, there can always be problems. Let’s go over those now.
Growing Problems
In hot weather, radishes bolt, sending up a seed stalk as quickly as possible. Once that seed stalk forms, your radish root is no longer viable. It loses its flavor rapidly and starts diminishing in size, as the plant will be using all the nutrition in its root to develop seeds.
Harvest as soon as the radish has reached a reasonable size to prevent bolting. This is true of virtually every radish type out there – an early harvest before radishes bolt is best! Also, don’t plant seeds when the weather is consistently over 75 degrees. At that point, your radishes will have difficulty developing good roots.
If your radishes are cracking, that is usually a sign of uneven watering. Give your radishes regular, even watering.
Woody radish roots are inedible roots caused by a combination of warmer weather and underwatering. They prefer cooler temperatures and regular watering that promotes good root growth. You’ll have a great crop if you ensure they have optimal conditions.
Finally, if all you seem to be growing is radish greens and no root is developing, you may have too much nitrogen in your soil. Radishes do surprisingly well in poorer soil quality. Adding a little phosphorus or potassium may help boost root development in your radish bed, too. You also may not be thinning them out enough – radishes need room to grow!
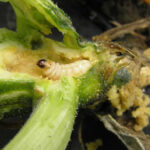
Pests
Some forms of nematode, such as root-knot nematode, cause problems with the radish roots. Combat this by adding beneficial nematodes to the soil. This reduces the population of root-knot nematode, as the beneficial forms seek out and kill the harmful ones. Alternatively, you can use an azadirachtin drench on the soil. However, this kills all nematodes, whether beneficial or pestilent.
Similarly, root maggots feast on your radishes. The best control of the root maggot is prevention. Place diatomaceous earth around the base of your radish seedlings, or put a floating row cover over them. The goal of both is to prevent the adult fly from laying eggs that hatch into root maggot populations at the base of the plant.
Aphids are a very common pest on radish greens, and cause the greens to wilt rapidly. To prevent aphid infestations or to eliminate them if they are already there, use a thorough coating of neem oil across all surfaces of the plant’s leaves. A pyrethrin spray can also be used.
Cabbage loopers not only chew holes through radish leaves, but they gnaw on the emerging tops of radishes and open them up to disease. Bacillus thuringiensis, or BT, is effective on all forms of caterpillars.
Flea beetles can also wreak havoc on the greens and eat into the roots of the radishes. Azadirachtin is useful against flea beetles as well. To prevent flea beetle infestation, you can use a dusting of kaolin clay over all surfaces of the radish to deter them.
Diseases
Downy mildew can become a problem on radish greens. While this doesn’t hurt the roots, if it starts too early, the roots may never have the chance to grow to a reasonable size. You can treat downy mildew with neem oil as a fungicidal agent. It may take a few treatments, but it will eliminate the mildew on the leaves.
Bacterial leaf spot can also form on radish greens. This, too, can be treated with neem oil but may take a bit longer for it to be effective on infected plants.
White rust can develop on radishes, wild mustards, and other plants such as spinach. This causes small, light green spots to form on the leaves. Gradually, the spots turn white and form a blister-like pustule. This fungus-like microorganism can be treated using copper fungicide.
Finally, club root is another fungal infection that plagues many types of brassicas. This fungus cannot be treated by fungicidal sprays or drenches. It can be incredibly hard to eliminate, and often infected plants that are impacted must be destroyed and not replanted in that area. You may be able to sterilize your soil by placing a clear plastic sheet over it for a few months during the heat of the late summer, but this will also kill off any beneficial nematodes and other beneficial organisms in the soil.
Frequently Asked Questions
Q: Are horseradishes also radishes?
A: While horseradishes and radish plants are both brassica plants, they are two different species. They grow similarly, and both have a spicy flavor, but they aren’t the same!
Q: Is wasabi a type of radish?
A: Also related to radishes, wasabi is another brassica family plant. It is not the same as either horseradish or radish, but it’s related to both and can have similar problems. Wasabi also prefers much wetter growing conditions than either horseradishes or radishes.
Q: Are radishes good for weight loss?
A: While a nutritionist can answer that question far more thoroughly than I can, it should come as no surprise that radishes contain quite a lot of fiber. Fiber can help you feel as though you’re full, aiding in weight loss. They’re also low-calorie foods and make a great light snack!
Q: What is the best way to grow a radish?
A: Start with our planting guide, then move to the Care section to see the best ways to grow radishes. Ensure you aren’t planting radish seeds in overly rich soil, and avoid fresh manure or compacted soil.
Q: Why is it so hard to grow radishes?
A: If you planted seeds in heavily compacted soil, you may have trouble growing radishes. Similarly, not watering enough or planting at the right time can impact growth. See above to determine what the issue may be.
Q: How long do red radishes take to grow?
A: Some of the faster-growing varieties mature in 3 to 5 weeks. Check the seed packet to determine when to go about harvesting radishes.
Q: Do radishes need full sun?
A: In most cases, yes. Plant radishes in full sun to partial shade for best results. Too much shade results in even slower growth than normal.
Q: How many radishes do you get per plant?
A: Each plant grows only one radish. Therefore, harvesting radishes means one veggie per plant removed.
Q: What can you not plant near radishes?
A: Do not plant radishes near hyssop or other brassicas.
Publicaciones relacionadas:
 Squash Vine Borer Control and Prevention
 Cómo deshacerse de los escarabajos japoneses
 Pimientos de hibernación: extender la vida de su planta
 Tomillo lanudo: de peldaños a cubiertas de suelo
 Planta de verbena de limón: Arbusto de limón dulce
 Cómo lidiar con el shock del trasplante
 Growing Swiss Chard: Leafy Greens And Tender Stems
 Cómo cultivar microvegetales de hinojo rápido y fácil